Sunday, June 3, 2012

Raised bed & archway to wildlife gardening success...

Hello All,

Welcome back for another instalment from Higgy's garden. I have so much to report at this very busy time of the year that I fear that I will run out of space and time before I'm halfway through this latest update!

Before I start with the gardening please let me take the opportunity to thank so many of you from all over the world for logging on to see how 'Higgy's Garden Project' is coming along! Your support is always appreciated and comments and question posed are both enjoyable and informative! Please do keep them coming as I love to chat and share my, plans and ideas with you as well as my successes and disappointments which make gardening so addictive and pleasurable.

I would love to tell you about every new project and piece of work that I have done over the last few weeks but unfortunately I will have to keep this down to 'hopefully' three subjects! I will attempt to update you about a new raised bed I've built, an archway and most importantly some great success stories with wildlife in my garden!

So firstly to the new raised bed. Many of you will know that it was with a stubborn reluctance that I built the previous raised beds following much nagging from Mrs Higgy who wanted to grow something that we could actually eat! An agreement was made that I would build the beds and advise on planting of veg but the upkeep was to be Mrs Higgys responsibility. Now on paper this seemed like a good idea but with all good ideas reality is a completely different beast all together!!!.....

Adding even further to my current workload I have to confess agreeing to build another raised bed (I really don't learn do I!!) Next to the Koi pond (built out of oak sleepers) we have a large expanse of paved patio which had become nothing more than a dumping site for my increasing supply of recycled 'free to collector' building materials! This was a real eyesore and being one of the first areas in the garden that you see it was crying out for a transformation of some sort. The idea of an extra raised bed was born to provide more much needed vegetable growing room (or at least that was what I was told!!) To keep with the wood theme I decided that I would build the bed in the same style as the Koi pond but using 3"x4" sawn timber rather than sleepers which are now unaffordable to us....

The raised bed was made out of 3"x4" sawn timbers which are effectively 8' long fence posts! These were laid on the floor and moved until the positioning was visually right.... 

Once happy with the positioning they were stacked on top of each other and screwed together using 'Timber Locking' screw bolts. These were drilled and screwed into every piece of timber at both ends with two extra bolts drilled from the top into the timber below! This gives really good strength and holds to whole bed together....

I then lined the whole bed with old compost bags which were stapled in place. This helps to retain some moisture in the bed, protects the wood helping to prevent it rotting whilst also acting as a barrier against my dreaded Horse Tail weed!! You must however remember to add a few slits or holes in the bottom for drainage of excess water.....

The bed was then filled with a layer of horse manure at the bottom and then topped off with a 50/50 mix of compost and top soil. I managed to find three separate sources of 'free to collector' top soil!!!
To add a further feature I have included some extra seating in the form of a bench at one end from an old off cut of 'waveny board' left over from a previous project! 

In this final picture you can see how this bed fits in with the style of the Koi pond and the tropical bed below it. The wood should weather down to a similar colour to these other features and blend in to the area nicely. This has proved an effective use of an area which previously had basically become a dumping ground and oversized walkway.... 

With the raised bed completed I decided to build an arch from this paved area leading through into the next section of the garden. My idea behind this was to give some division from this paved section and the lawned area. The planting in the paved area has a more 'tropical' and 'jungley' feel as I have used Bananas, Cannas and bamboos to create this feel. In contrast the lawned area features large perennial borders containing colourful 'blousey' flowers planted to look pretty and attract bees, butterflies and insects. Having only one access route gives the sense of entering a completely different section of the garden and hopefully adds interest and surprise....

Unfortunately not the greatest picture but once completed and planted with some climbing plants this archway will provide the only route from the paved section through to the lawn and perennial borders....(I will update you on this current project in my next post)

Finally I wanted to update you on some wildlife success stories which make my efforts here so worthwhile....

As you are aware my passion for gardening is partly driven by my enjoyment of wildlife and the opportunity of attracting different species of animal, bird and insect into the garden. With this in mind I have built designated wildlife areas in the garden whilst striving to keep the garden attractive, interesting and usable to all the family. The wildlife area has started to mature nicely and after only two years we have seen a dramatic increase in all types of wildlife. Of real note is the volume of insects and butterflies visiting and residing in the garden. The log pile has started to rot nicely and holds voles and a large number of beetles and other insects. The wildlife pond although only a few weeks old already has a resident toad under the old log feature that I included! I have seen water boatmen and diving beetles in the water and the bog area has grown it's first Cuckoo flower! Leading from the pond and log piles brings you into our wild flower area which is currently under a degree of redevelopment and re-planting, in my next post I will bring you up to date with this exciting project which I hope will see longevity with the inclusion of perennial wild flowers many of which are native to Somerset! This spring has already seen a massive increase in butterflies here with Orange Tips, Peacocks, Red Admirals, Large & Small Whites, Brimstones, Holly Blues, Small Blues and Speckled Woods all making appearances so far! Large Red Damselflies have become common and we had our very first Broad Bodied Chaser Dragon Fly last week! The bird count is also climbing with 43 different species now recorded here with the latest being a Chiffchaff who sits in the trees at the bottom of the garden singing it's heart out all day long! The list really is endless and I hope that this success will help to demonstrate that gardening for wildlife is no longer about 'scruffy and boring' but can really be exciting, stylish and most importantly fun!!?.....

Rather than ranting on any more here is a selection of current visitors to the garden recently....

Broad Bodied Chaser....

Noonday-fly...
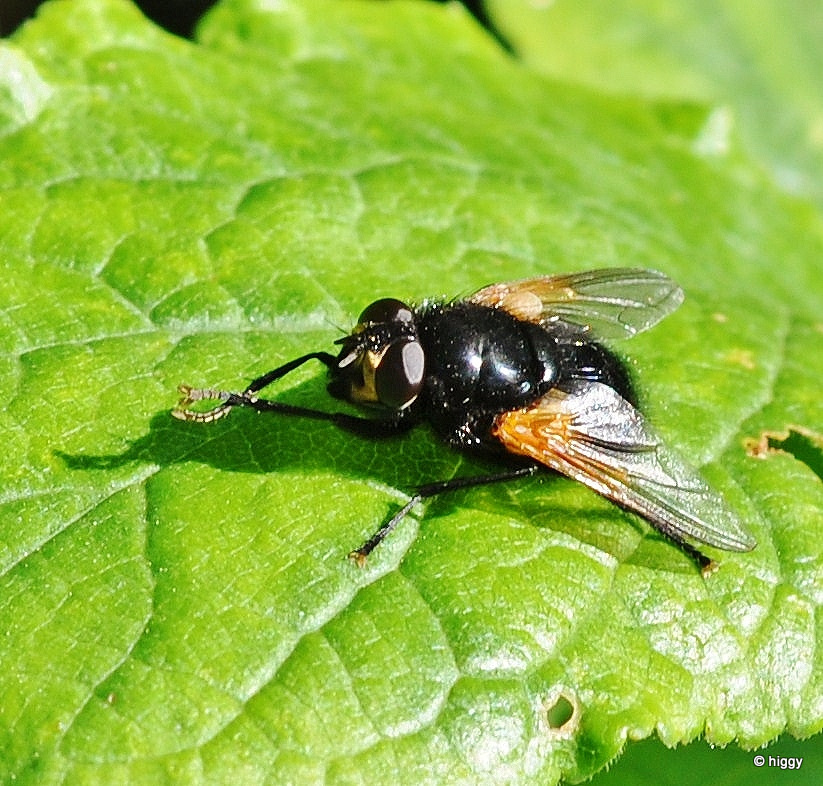
Crane-fly...

Peacock Butterfly....

Buzzards are daily visitors hunting voles and mice in the field and occasionally even over the garden! This particular Buzzard has developed a 'kestrel like' hover for hunting this smaller prey. I now regularly see it hovering over the bottom of the garden prior to dropping down for the kill..... 
Much to the annoyance of our local Corvid population who do their best to chase it off!!!....

Large Red Damselflies are very common in the garden now!...

Our newest feathered visitor in the garden is a Chiffchaff  who sings it's distinctive "Chiff Chaff" song from dawn until dusk from the trees at the bottom of the garden. Despite it's constant presence it's almost impossible to see amongst the dense leafs! (I took this picture in nearby countryside!)


Unfortunately that's about as much as I can fit onto this post and I imagine I've bored you enough by now!! Next time I will get you up to date on the wild flower area and include some pictures of what's growing in the garden at the moment. We will also re-visit the arch and a couple of small additions around it. As always I will keep you informed of wildlife sightings and hopefully continue to inspire you all to get out and make wildlife habitats in your own gardens!!...

Please do keep the feedback coming and requests of anything you would like to me to include in future posts?

Cheers

Higgy  


Friday, April 13, 2012

Building a new wildlife pond..... for free ?!!?

Hello All,

I think I left last time in the middle of building my new wildlife pond and with pictures of the old bath tub and a big pile of old pond liner! Many of you I am sure now think I'm completely mad and must be wondering how on earth I can rescue this mess and turn it into a small pond!!??.... On top of this I think you will also remember that I said I planned to do this as cheaply as possible of if possible for free!?....Can't be possible can it???...

So without further ado lets crack on and see what the last couple of weekends have produced!....


So here is the pond just after being finished. As you can see to save money I used materials which were available to me, recycling what I could! The rocks were 'free to collector' and will give good hiding places to all manner of wildlife. I have filled between the rocks with soil that when planted will soften the look slightly.


The wooden stakes were pulled out from the original path edge and reset to create separation between  the pond and the path which has been given another good layer of bark.

This old wheelbarrow was left by the previous owners and was sat rusting in the hedge. In true Higgy fashion I filled it with soil and have planted it with irises to add another feature and recycle an item which would otherwise be skipped! I do however have a little more work to do here to settle it into the scheme a little better!

The logs I saved following the original pruning of the trees when we first moved in and I have been waiting for the right project to use them in! If you look in the bottom right hand corner of the picture below you will see that the edge of the pond is actually a good distance away from the main body water. I have filled these shallow margins with aquatic soil and pebbles to give boggy areas which will eventually be filled with a variety of irises and bog plants. The large log you see here is actually laid across the margins and is already home to a toad!!...   

The final picture shows where the pond is situated next to the wildlife area which is linked by the bark covered paths which run through it and and completely around the pond. At this stage the pond looks a little harsh but as the rocks weather and the plants grow up it should hopefully sit seamlessly in the wildlife area of my garden.... 

So how much did this little wildlife pond cost me to build? Is it something that anyone could do?.....
Here is my breakdown of materials used and their cost.... judge for yourselves!

  1. Tin Bath ..... Rescued from being skipped ... Free
  2. Liner ..... Saved from temporary fish holding tank when we moved ... Free
  3. Cement Pavers (used for levelling and foundations etc) ... Free to collector
  4. Cement/mortar .... bought from Wickes .... £12  http://www.wickes.co.uk/Cement+Mortar/Mortars/icat/cmmortar/?tmcampid=97&tmad=c&tmplaceref=PPC_ggl_0002219&gclid=
  5. Logs .... Saved from tree pruning ..... Free
  6. Rocks .... Free to collector 
  7. Pebbles & other landscaping stones ... recycled from around the garden ... Free
  8. Soil / Compost ... free from garden
  9. Wooden path edge posts ... removed and reused from original path ... Free
  10. Water .... from Koi pond .... Free
  11. Plants ... Mostly cuttings from other plants although a few bought from ebay at 50p - £1 each ....£8
  12. Pathway Bark ... Wickes offer earlier in the year 3 for £10  http://www.wickes.co.uk/bark-chippings/invt/200248/ 
So adding up all that I spent, this whole project cost me no more than £30!! I think that this is actually really good value and shows what can be done with a bit of effort and without spending too much money! What's even better is that two weeks on I have already seen diving beetles, water boat men, spiders and of course my resident Toad in the pond!! Now to me that's already worth every penny and every drop of sweat!?

Can you do it? I don't see why anyone couldn't do this for as little money as I have. The key to successful recycling is to see the opportunity in everything. The old bath tub was someone else's scrap, which they were more than happy to have taken away! The large logs I saved 18months ago as I knew at some stage they would fit into a project like this wildlife pond. Keep an eye on your local papers and watch out for the 'free to collector' adverts, heavy items such as rocks are difficult for some people to get rid of and they are actually grateful to have you dispose of them!

Unfortunately time has run out on me again so I will have to leave this post at the end of this project but will update you again very soon on a couple of other projects I have  now started!!

I think my last note must be about my feathered visitors who are all now actively building nests in the hedges and trees here. I spent and hour with my four year old daughter yesterday just watching a female Blackbird collecting nest building materials, she then transported them to some dense Ivy growing on our fence and started building her nest! A great way to have quality time with young ones whilst being educational at the same time! Unfortunately no pictures from this particular resident but here's one of the many Blue Tits currently visiting and nesting in Higgy's garden!....

One of the many resident Blue Tits in Higgy's garden
      
 Finally a few other pictures taken in the garden recently....

Anemone...

Blackcaps have now become regular visitors, which is great to see!

Hoverfly enjoying the unseasonably sunny weather... 

Ribes Sanguineum (Flowering Current)...

As always a big thank you for reading my blog I hope that it will inspire some of you to have a go at recycling, and trying to garden as cheaply as possible whilst continuing to get pleasing results!?

Cheers

Higgy 

Sunday, March 11, 2012

Building a new wildlife pond.....

Well hello All....!!

It really has been quite some time since my last post which I apologies for! Unfortunately I had a bout of illness just after Christmas which stopped my gardening for several weeks! Currently I am waiting for hip surgery and actually went down with Sciatica and Kidney Stones at the end of December stopping all physical activities and giving me seven weeks off work! I am now happy to say that I'm pretty much back to normal  despite the hip which will obviously be a problem until fixed!

So what's happening in my garden?

Well nothing up until last weekend when I started my latest project of a new wildlife pond! with the mild weather that we have experienced recently and following my long forced absence from the garden, now seemed like the perfect time to get stuck into another project again!

The site for the pond is right at the bottom of the garden in a corner of the wildlife area (makes sense doesn't it!!) To give you a better understanding here are a couple of pictures to show you the site for the pond....

So here's the site for the new wildlife pond, it's in the bottom corner of the garden and my wildlife area. In these pictures the site has been cleared ready for excavation of the pond...


Now in usual Higgy style as much of the pond construction as possible will be completed using recycled materials and done as cheaply as I can. The site is not really the ideal place for a pond as there are a couple of large trees and a Hawthorn hedge here! Whilst planning the pond I realised that roots were going to be a major factor and therefore just using a liner with no protection was out of the question so I set about thinking of a solution to this problem. Whilst out and about I visited a house with an old metal bath in he back garden that was awaiting a trip to the local tip! Seeing an opportunity and a solution to securing the bottom of the pond I asked the occupants if I could dispose of it for them. Not being able to fit it into their car they were more than happy for me to take it away free of charge! I now had to think about the liner to sit inside the bath and the rest of the pond, a quick rummage through my workshop produced the old liner I had used to make a temporary holding tank for my Koi when we moved house a couple of years ago (never throw anything away as you never know when it might come in handy again is always my motto!). So for the grand price of zero£ I now had all I needed to make my pond water tight!!!

Whilst excavating the pond it quickly became apparent that the root problem was actually much worse than originally anticipated. In fact the problem was so bad that I had to abandon my plans to completely bury the bath and settle for part burying it and then making up the difference when landscaping the area around the pond.

As normal here is the project in pictures to give you a better idea of what I'm actually trying to achieve....

Here is the old tin bath which I have turned upside down in it's final position so that I can mark the outline for digging. You can also see a nice selection of logs which I saved last year ready for landscaping this project. Planning ahead like this really can save you money! 
in this picture you can see the outline clearly marked on the soil ready to be dug out

Once I started digging the anticipated root problem was far worse than I first expected so I abandoned fully burying the bath and settled for part burying it! The most important thing in any pond build is to ensure that you are 100% level so that you can hide the liner with an even water-line. You can see here that I used smashed up paving slabs (free to collector!) to level the tub.....

   Once that the paving slabs were cemented into place to create a strong frame around the bath and solid base I packed heavy soil & turf in to create the contours which will be the shallower water and bog areas of the pond. Once packed in firm it can be scooped out to make deeper areas and/or planting pockets...
In the two images here (above/below) you can see that the bath is encased by the paving slabs and soil. Once cemented into placed the flat (and level) concrete slabs will provide good foundations to build the small retaining walls on..... 

Once all the foundations are in place and I was happy with the contours in the soil the liner is laid over the pond (as below) and part filled with water. Notice that the liner is bigger than the pond all the way around which allows for the building of a small retaining wall and overlap which can be trimmed off later....  

So that's about as far as I have got with this project so far. Unfortunately I am no longer able to work quite as hard as I used to do and I am limited when lifting heavy objects or digging etc!! With all things there is always a way around it however I have to except that with my current restrictions my 'projects' will now take longer and occasionally I have to ask for assistance with heavy objects! Talking of heavy objects I have also managed to locate another load of 'free to collector' rocks which I now have stashed ready for the landscaping stage of this project. Due to the fact that I have now been forced to move to a 'part buried' design I will have to do quite a lot of 'creative' landscaping around this pond to allow access to the wildlife that I want to attract to it!....

Apologies that it has taken me a while to get another post written but I am hoping that I shall now be writing a few on a more regular basis!

Next time I shall be landscaping around the pond in the hope that a frog will actually be able to reach the water!!! I will also give you a full update on my feathered visitors and anything else that might be happening in Higgy's garden!...

Thanks for reading and as always I'll see you in Higgy's garden on my next post!

Cheers

Higgy

Friday, December 30, 2011

Compost Bins & Bird Song.....

Hello All,

I do hope that you have had a great Christmas and received all that you asked Santa for!?....I know that my four year old daughter received just about all she asked for but more importantly we have been able to spend some quality family time together due to a nice long break over the Christmas period. 

It's been quite some time since my last post as life in Higgy's garden has been extremely quiet through the last couple of months with very little action of any kind! I wound the garden down in October as we had a colder spell which I mistakenly thought was the start of our winter only to see really mild weather through November and December! I have to say that due to this warm weather and the amount of berries and fruits that were about I also had virtually no feathered visitors either!

On the plus side this quiet spell gave me good opportunity to get out with the camera and take lots of pictures of our local sea birds. This has been great fun and a nice break from the hard work completed in the garden so far!

Having rested for a while I did start to get restless and as you will have read in the last post start sorting out my wild flower area ready for next season.

As we are situated on what is classed as 'wetland grazing land' the garden does get really wet underfoot at this time of year making many of the waiting jobs in the garden impossible to complete until Spring arrives and the weather and soil dries out a bit! Despite this I have managed to get out this month and build a compost bin which I had been trying to get done for some time!

Not the most exciting of projects but here it is none the less....

 Here is the first of two (possibly three) compost bins. Not very glamorous or pretty but functional and completely free!! In true Higgy fashion the pallets were from an advert I put on a wanted board at work, the stakes used to fix them in place I had left over from the play area project. I simply cut the pallets to size and then drove the stakes into the ground to secure them in place....Easy!! I have added a nice helping of 'free' manure on top of the initial compost to help get it started
  I have enough pallets left to make a further bin opposite this one and possibly another bin behind which once established should provide some good quality compost hopefully!

As far as gardening goes that's about it other than potting up a few tender plants to over-winter in the greenhouse and clearing out the two raised vegetable beds as below....

The two raised vegetable beds have been cleared out and a good helping of manure added onto the surface. Once the manure has been washed in by the rain and rotted down a bit more I will dig it into the beds ready for spring planting.

As stated above the garden has been devoid of bird life for a good couple of months and I have to say that by mid December I was starting to get a bit worried that something was wrong. On the 18th December we had our first 'proper' frost here in North Somerset and I have to say that I was more than a little relieved to see a steady flow of birds back on the feeders with the arrival of - Robins, Blackbirds, Black Caps, Blue Tits, Great Tits, Sparrows, Crows, Black Headed gulls, Dunnock, Green Woodpecker, Chaffinches, Gold Finches, Song Thrush, Jay, Magpies and a Buzzard who flew through right past our kitchen window obviously looking for a quick meal!!!....
Since the above arrivals we have started to enjoy a steady flow of further species including new visitors such as Redwings and the return of my beloved Reed Bunting today! It really did make me smile to see her back on the feeders tucking into the seed! 

With the arrival of my feathered winter visitors I have noticed the garden come alive again with the melodic sound of bird song which is a joy to sit and listen to, how lucky we are to be privileged to be able to enjoy these beautiful and fascinating creatures!

It's great to finish on a high point again and I'll leave you with a few snaps of my recent and current visitors to Higgy's Garden....

1. Blackbird - we have regular visits from different Blackbirds which can get quite 'heated' sometimes!!

 2. Robin - Everyone's favourite and again we often see two or more at any one time here

 3. Blue Tit - Always fun to watch hoping around after insects

 4. Great Tit - Already paying great interest in one of our bird boxes!

5. Goldfinches - Loving the seed heads left on the Verbenas & Rudbekias in the perennial border. It's great to see this as I try to grow plants which look great in summer but also provide food for birds in winter so a real success story for me to see up to six birds regularly feeding on them!  

6. Redwing - A brand new visitor to Higgy's garden this year and I have a nice little flock of about 8 or so Redwings visiting at the moment so really pleased with this!

7. Black Headed Gull - where there's food!!!......

8. Grey Squirrel - And of course it wouldn't be complete without these little critters (love them or loathe them!?)....

Well that really is about it I don't have much else to report but I am so pleased to see the return of my feathered friends and of course first time visits for others! It is great to see and hear the garden alive again after a long period of inactivity. My next project is to start the wildlife pond so I'm hoping to be able to report my progress really soon.

As I write this post we have just entered New Years Eve here 01:00hrs so I bid all of you a very happy and successful New Year! I look forward to speaking with some of you again in 2012, please do feel free to leave me comments and questions as I love to hear your thoughts on my garden and blog and have a good old 'natter' with you!....

Cheers

Higgy 

Wednesday, November 23, 2011

Wild flower lawn preparation & a mean bird.....

Hello All,

Isn't it a strange old Autumn that we are having? The weather is just so warm still and October was the warmest on record! I think with the temperature still in the teens November is also set to become a record! Unfortunately I started to wind down my garden in October so don't have very much of interest showing currently, if I had been able to predict this warm weather then I would have made some effort to keep things going longer and probably planted for a bit of extra Autumn colour....

My lack of hindsight has at least given me a bit of a break from the hard graft and allowed me a bit of time to reflect and more importantly plan ahead to next year!

With spring in my mind I have planted 500+ Spring & early Summer flowering bulbs including: Mixed Narcissi (Daffodil), Mixed Alliums, Anemone 'De-caen', Snake Head Fritillary, Tulips, English Bluebells amongst a few other different species. Hopefully come spring I should be able to post pictures of their success!!..

My main project this last couple of weeks has been a complete re-think of my wild flower lawn. This area actually flowered quite well this summer but it was mainly due to the annual wild flowers, which I grew on and planted out as plugs into the lawn. I did lose my fair share to slugs who took an instant liking to my cornflower plugs stripping them within two nights! I am very much against using chemicals and therefore don't use slug pellets in the hope that the wildlife will in time balance out and control them for me to some degree. With both this and the labour involved in mind I have decided to completely strip the area of it's original turf to get rid of the Rye Grass, which is to competitive for many of the delicate wild flower species that I would like to get established here. The long term plan is to establish perennial wild flowers which will grow and seed each year hopefully giving a good variety of colour and longevity to the meadow....so I grabbed a spade and set to work....

The below pictures show the area which has been de-turfed, I have also taken the opportunity to add extra interest in the form of a 'curved' path, which will weave through the wild flowers on both sides.  

 In all of these pictures the de-turfing isn't completely finished as I wanted to show the depth of turf taken off. Once completed it should give two large areas of wild flower meadow/lawn. 

Once the turf had been completely stripped the remaining topsoil was lightly dug over and raked to provide a nice fine bed of topsoil for sowing the seeds into. Deciding what flowers to plant was actually quite difficult as they need to like the area they're planted in and more importantly thrive in my heavy clay soil, which can get quite damp. After much deliberation and a lot of internet searching I came up with the idea of actually planting wild flowers which are native to Somerset. This seems to make sense and by choosing carefully I can grow plants which would usually grow in this type of situation. Also flowers that are native to this area should help to encourage lots of butterflies and insects which would normally be attracted to and feed on these plants. So with my planting ideas in place I searched for seed suppliers and came up with these two on-line companies who have so far in my experience been really good. Both of these companies had a large selection of seeds at what seemed like a good price and from both of them my order arrived within two days of placing it!

Landlife Wildflowers -
http://www.wildflower.org.uk/department/wildflower_seed_mixtures/

Emorsgate seeds -
http://wildseed.co.uk/species/category/wild-flowers If you click through on this link and then click into the actual species you are interested in you will see it's county of origin. I used this to research and order the Somerset native species for my wild flower area.

In both cases the seeds arrived within two days, well package with good quality individual packets of each species inside....first impressions are very positive for both of these companies.

Landlife Wilflowers
 Emorsgate Seeds

So as far as gardening goes that is about it, I have rescued tender tropicals such as Cana and Banana plants which have been potted up and put in the greenhouse to overwinter.

Bird life in the garden has been really quiet recently with very few birds visiting the feeders. The extremely mild weather and 'massive' berry crops in the local hedgerows has meant that 'natural' food of the birds is in bountiful supply! This is a great thing for the birds but not quite so good for those of us who enjoy their visits!

One chap who has become a regular visitor to my Koi pond is the Grey Heron below! Fortunately my covers are doing their job and he hasn't been able to catch any fish but I do wonder how long this clever bird will take to find a way around my defences!!?...

A persistent Grey Heron, who despite the covers I made for the Koi pond is visiting regularly.... I wonder how long it will take him to work out how to get around the latest obstacle??... 


So a quiet few weeks but nice in a way and time to get out with the camera and fulfil my other hobby of Nature Photography. If you would like to see more of my pictures then I have now included a link to my Flickr page where many more wildlife and nature pictures are displayed.

Thanks for reading! I hope you are all still enjoying my ramblings? As always please do message me and leave comments or feedback, which I love to read. I will always reply to you and answer your questions if I can!....

Cheers

Higgy