
Once again time has got the better of me! But I have been out making the most of the good early sunny hot weather. It certainly beats all the wet weather that we had over the winter time and it's not only me who's been out enjoying the weather but the wildlife also, which is once again starting to wake up in the garden.
To pick up where we left off on the last post I will continue to guide you trough my main project at the moment which is of course my wildlife pond build....
On the last post we left the build just as we had finished excavating the actual pond. Being for wildlife the pond doesn't need to be to deep but I still like to have an area somewhere in the pond that is at least two foot deep, this deeper water gives a safe area for insects and amphibians to over-winter in if we should get cold winters. In a wildlife pond you wouldn't generally keep fish but I will mention here that if you do build a pond with the intention of keeping fish then the pond should be at least three foot deep. My own opinion is that it should be at least four foot in some places for fish keeping.
So here we go then....
Once excavated I crawl around inside the pond and remove any stones or roots that I can see and which could potentially puncture the liner.

There are various types of liner and my first choice would normally be EPDM which is a tough lining material with all the attributes of a butyl rubber liner but at less cost. Unfortunately current finances meant that I couldn't afford EPDM and I've opted for a PVC liner of a good quality. To help protect it I have also purchased a good quality pond liner underlay...

Once the layer of sand about half to one inch thick has been added around the whole pond and firmed in I add the underlay ensuring that it overlaps well where there are joins. I attempt to get a minimum of two thicknesses across the whole pond area.....

Now it's time for the liner but prior to fitting it pays to lay it out flat on the lawn in the sun, this warms the liner up and makes it more pliable and therefore easier to mold into place....

I actually laid this liner on my own but it does pay to have a few people on standby ready to help!!
Then run a hose into the pond and let it gradually fill up. Whilst this is happening you must be present to neatly fold and neaten creases as the liner molds around the contours in the pond. If you don't get it neat now then you won't be able to make adjustment once filled as the weight of the water won't allow you to change how the liner lays...
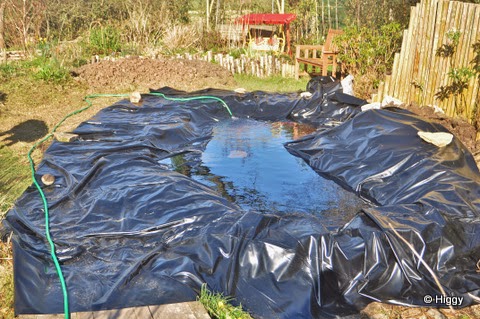
Trim around the edges but be careful to leave a good overlay as when fully filled the water could still pull down the liner a bit more...

Now you are ready to start thinking about the landscaping around the pond and how to hide the edges of the liner....
I decided to add a bridge and this was simply added by concreting some wood into footings on each side of the pond and then once dry screwing some 3"x3" posts across them as below...
.JPG)
This simple bridge was made out of some old fence posts and now creates a walkway to the seating pod...
.JPG)
I decided to hide the edges of the pond by putting large rocks on the upper shelf and then back-filling the space behind with a mixture of clay soil and fine gravel. This makes the perfect planting medium for your marginal plants....
.JPG)
Note that I re-used the clay from the excavation and mixed it 50/50 with fine grit, this is perfectly OK to do and will save you a lot f money over buying unnecessary pond compost.....
-001.JPG)
So here is the pond once the marginal landscaping was finished...
.JPG)
At one end I have included a shallow beach area that allows easy entry / exit to wildlife to safely use the pond. This is especially important if Hedgehogs fall in the pond to ensure they can get out....
.JPG)
As if giving this new feature it's seal of approval my resident Blackbird has taken over the job as security guard for the pond and uses it at least twice a day for his morning and afternoon bath!!!!....
.JPG)
.JPG)
Although I have already started planting a few wildflowers around the pond and preparing areas to put back to wildflowers and make up for the lost area from creating this new feature, I will leave this update until my next post. This should give plenty of space to give you the names and pictures of the plants that I intend growing to attract all of our beloved pollinators and of course in the hope of attracting a few more new species into the garden!
This just leaves my usual round up of what wildlife we have been seeing in the garden over the last few weeks....
Sticking with the pond theme what about this magnificent Great Diving Beetle - Dytiscus marginalus. A first for the new pond and a first for the garden!!...
.JPG)
I make no apologies for posting up another 7-spot Ladybird as they are so numerous in the garden which is great!!...
.JPG)
Although common a new recording for the garden was this Bee Fly - Bombylius major

Another new record, Sloe Bug - Dolycoris baccarum....

Not a new hoverfly for us but welcome none the less was this Syrphus vitripennis

It has been a great year for us in terms of birds, not new species but great numbers of our regular birds with the highlight for me the continued daily presence of our Reed Buntings - Emberiza schoeniclus.....
.JPG)
These green / blue beetles are called Chrysomelidae Alticinae and were in good numbers and breeding in the garden last month....
.JPG)
Finally it is absolutely brilliant to see the return of our hedgehogs and they are actively feeding in the garden and seem especially partial to my dry meal worms that I put out for the birds!

Hedgehogs are in serious decline so I'm really pleased to have the back in the garden again. I'm hoping that my hedgehog houses have helped by giving them a safe warm place to overwinter in. I can't check the boxes as they are buried under the hedges in the garden to provide safety and extra warmth for any hedgehogs that are using them but live in hope that they have helped.
Despite having posted my plans for a home built hedgehog house on Facebook recently, here they are again for anyone else who wants to help save our hedgehogs by providing shelter in their own garden....

So that's it for now, next time I will update you on the planting in and around the pond which will include my wildflower area which is currently going through a complete re-vamp!
As always thanks for reading and do please keep your comments coming in as I will always answer them and continue to enjoy chatting with you all....
Best
Higgy