Tuesday, December 31, 2013

2013 Successes, a BBC Appearance & Plans for my Wildlife Gardening in 2014.....

Hello All,

Firstly a quick note to say a big thank you to all my followers public and private on both of my blogs and of course Twitter where we are starting to build a little momentum at last. A particular thank you goes out to those of you who have sent in comments and questions it is this interaction that I particularly enjoy! I do hope that you all had a great Christmas and are looking forward to wildlife gardening in 2014!?

2013 really has been a pivotal year in Higgy's Garden Project with many new species of invertebrate discovered and recorded and a few changes made along the way. Probably the biggest highlight for me personally was the approach by the BBC that resulted in my appearance on BBC Springwatch and the chance to chat about butterflies and moths to millions of viewers which was a complete thrill.

I think my thought for this post is to show some of my 2013 highlights and of course unveil the plans for a big project for 2014, which I hope should be of interest to everyone.

As you will all be aware 2013 started off cold and wet and the late Spring seen very little happening in the garden except some mild panicking that we may not have anything for the BBC to film when they arrived in June! The cold Spring meant that we had very few wild flower plugs big enough to plant out and the area looked a bit barren! In a desperate plea to get the wild flower area looking good for filming I ordered in some plugs but they failed to turn up in time!

The garden spent a good time underwater in early 2013 which really didn't bode too well with filming!!.... Below is our DRY gravel river bed with the bridge completely submerged!!...

Luckily the wild flower area came right of the day of filming and despite less wildflowers than previous years it demonstrated what can be achieved by panicking and a lot of hard work!!!...

The old stone bridge and gravel river bed turned up trumps and is naturalising nicely turning into a haven for all sorts of insects and wildlife.... I think that the drenching it got in Spring actually helped it this year and as can be seen below it's now wild and alive with wildlife.....

Small mammals such as Wood Mice and Voles are clearly using the garden and a hunting Kestrel seen hovering over the wild flower area this year demonstrates the diversity in the garden now...

So with the weather clearing a bit into summer we experienced a complete heat wave which again brings it's own challenges with he heavy clay here drying out and cracking...

From one extreme to another.... wet Spring floods were followed by a summer heatwave in 2013!..

The wildlife didn't seem to mind the extremes of temperature and continued to arrive in the garden in good numbers that sometimes made recording it all quite difficult. The planting has also seemed to have settled in to this environment coping with extremes very well and to be honest I didn't do a massive amount of maintenance throughout the year which is the beauty of wildlife gardening.

Despite the variable weather conditions the garden fared well with a good display of colour in the wild flower area and the pollinating beds as you can see below...

The benefit of a well balanced and surprisingly lush garden in a hot summer was clearly demonstrated by the number of new species of  invertebrates that we recorded. I'm going to show a small sample of some new species to the garden below...

This Bee Beetle (Clytus arietis) was a first and arrived during filming of the BBC Springwatch program so couldn't have timed it's arrival any better!...

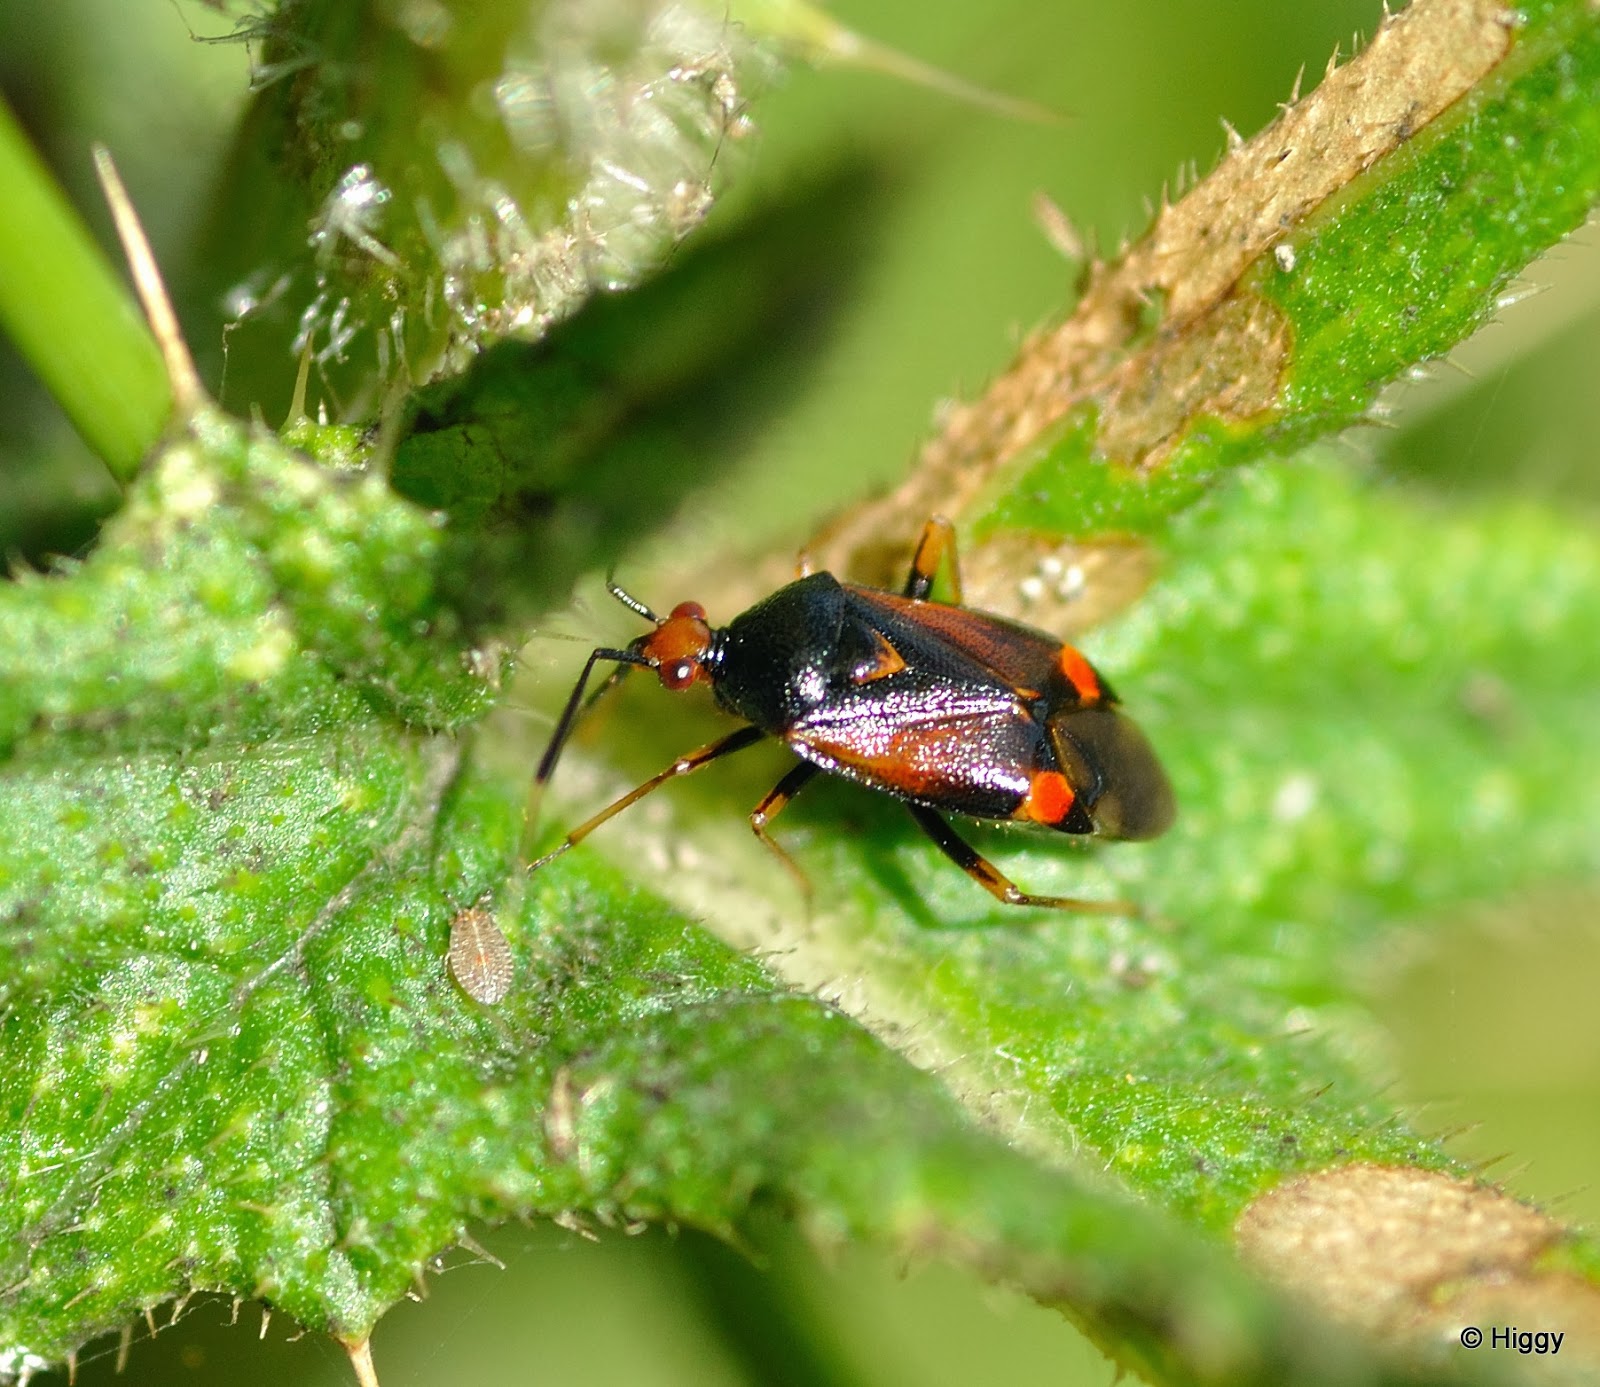
I recorded several new species of flower & leaf beetle during the year including this pretty little Deraeocoris ruber....

Shield Bugs showed well with new species including really good numbers of Forest Bug - Pentatoma rufipes. Not every gardeners delight but more than welcome in the wildlife garden and of course a vital part of the food chain...

The garden butterfly count went up to 20 species with the arrival of the Small Skipper and Marbled White as shown below....

Above is only a small selection of the many new species that we recorded but hopefully demonstrates the benefits of gardening for wildlife and the success that we are now experiencing here.

The other thing that is worth a mention is the very successful moth trapping sessions that we started this summer. These included a large trapping session attended by some of the local wildlife group who all enjoyed not only a great time identifying moths but a cream tea made by my wife! 

Moth trapping in the garden was new for 2013 and proved extremely successful with well over 100 species recorded this summer! Including this impressive Swallow-Tailed Moth - Ourapteryx sambucaria...

A personal favorite for me was definitely two recordings of the gorgeous Hummingbird Hawk Moth - Macroglossum stellatarum. This is a species I have only dreamed of seeing in the garden until now!

I really haven't got room to show every species new this year but I hope the above has at least demonstrated some of the new comers and given you a feel for what we have achieved in 2013 and of course what you could achieve in your own garden.

So with 2013 now at an end we must look forward to 2014 and planning what changes are required to encourage even more wildlife into the garden in the coming year.

I have thought about a lot of things that could be changed but one thing that I keep coming back to is a decent sized wildlife pond with a much bigger body of water. We already have three small ponds and it is often said that several smaller bodies of water are better than one large pond in the wildlife garden! Well I'm taking this one stage further by adding a bigger body of water to my other smaller ponds to try and encourage more and different dragon and damselflies into the garden over the next few years.

It has been a bit a head scratching as to where I could accommodate a bigger pond but with some careful planning I will be putting it alongside the wild flower area. This will mean this area reducing in size somewhat although by careful moving of plants and resowing elsewhere in the garden I think that we can keep the same area of wild flowers if not increase it slightly by spreading it out in different areas of the garden. This is a bit of a trade off but I think that in the long-term it will be well worth it.

So you will have to keep reading the blog to see how this develops but in the mean time I can offer a little taster with a very rough sketch of what I hope it will look like once complete...

I apologise for the look of this sketch I promise my 6yr old daughter didn't do it ! LOL Hopefully it gives a guide of what mad idea is currently in my head and what is planned for 2014...

My thoughts put down on paper for how I want the new wildlife pond feature to look and how I hope it fits seamlessly into the rest of the garden....

My thoughts for this pond feature is that it will be dug down into the ground and my wild flower planting will run right up to the edge of it to help it sit naturally into the site. Already in the wild flower area is an amount of Cuckoo Flower and Ragged Robin that will love the dampness this feature should provide and help to blur the border between land and water! Other planting will include Irises for dragon fly nymphs to climb up and hatch out on, whilst the flowers of many are loved by bumble bees. I also have a large amount of Purple Loosetrife cuttings that will add height, colour and structure at the rear of the pond and into the pollinator planting bed. 

Landscaping wise I plan to build a false stone retaining wall at the side of the dry gravel river bed. This will be complete with an old rusty water sluice to give it a connection to the dry river bed and help it sit more naturally in the garden.

That's the plan for 2014 and a look back at a successful year in the wildlife garden so I bid you a happy New Year and lots of wildlife watching and gardening for 2014!!

Best wishes

Higgy 


Saturday, November 16, 2013

SpringWatch Comment tempts a new shed for building a Hedgehog House in!!..

"WELL, YOU DON'T GET A GARDEN LIKE THIS BY HAVING A TIDY SHED MARTIN!!"

My now famous quote on BBC Springwatch has brought me a lot of stick since it was aired in front of a few million viewers!! Even this week someone recognised me and quoted my now famous statement!! LOL

All this talk of my untidy shed has got me thinking and I'm slowly coming to the conclusion that I need a new shed to store my 'junk' in but would also like it to double as a 'hide' for watching and photographing the birds and wildlife that visit the garden.

The dilemma that I now find myself in is, do I get some reclaimed / recycled materials and build a 'shed' as I normally would or is this a step too far? As I'm wanting to actually spend time in the shed as well as using it for storage maybe buying a brand new 'fit for purpose' shed like the ones featured here... http://www.shedsandthings.co.uk/  would be a safer option? I have had a flick through the sheds on this site and there are quite a few sizes and designs to choose from. I will also have to decide where the windows need to be how many windows I want, if photographing birds then I will want plenty of light etc, Oh decisions decisions!...

The old shed was inherited with the house and even before we relocated it the roof was loose and it was home to a family of mice... 
 With the roof coming off during it's move and despite the lick of paint the old shed has just about had it's day....
Here's the new workshop when we first installed it and I'm thinking my new shed/hide which will sit beside it should look more like this with double windows to let in more light and offer good views of the bird feeders... 

So that's my current dilemma and of course yet another plan to take forward to next Spring when I hope the weather will be more suitable for this kind of job.

Whilst it's great to think about a new home for my junk and somewhere warm and comfortable for me to sit and photograph the birds, we must continue to remember the difficulties that our wildlife has over winter and what we can ALL do to help it out.

Last week I wrote about what you can do to ensure that your garden ponds overwinter successfully and so that all the wildlife within the pond stay safe through the winter months and potential freeze. Well this week I intend to show you how to make a simple hedgehog house that will give a needy hedgehog a warm and cosy home for the winter. As usual I intend to do this using pictures with and explanation of the construction above and so that you can follow along and build one yourself...

Firstly you will need to find some wood and cut it to the following sizes that I have shown on my plan here...

Here are my plans for building a hedgehog house of your own. The sizes are a guide but offer a good sized house for a hog....
When choosing your wood it's fine to use scrap pieces to make up the bigger pieces like the roof. The only consideration when using separate pieces is to ensure each piece is secured together or screwed down to the sides (although don't do this until you have sited the box!). The house in the picture below uses three pieces of timber for it's roof, as the house will be buried this will cause no problem. I prefer to use wood that is 3/4" - 1" thick. 

Once you've completed building it a suitable site needs to be found to place the house. I chose an area right in front of a hedge and next to tree roots. The reason for this is that we have a dog and the neighbours have a cat that are both interested in hedgehogs! By having the entrance in the hedge between the gardens prevents these and other predators from getting into the box. By siting it here among the entanglement of roots and trunks of the shrubs also negated the requirement for a tunnel in this instance. However if you don't have this natural defense at your chosen site I fully recommend using a tunnel to prevent cats from attacking the entrance. 

Once the site is chosen a hole is dug big enough for the house to be located below ground level. Once excavated place the house into the hole and put in some bedding such as old woodshavings and leaves. This is the reason why the roof isn't screwed into place until this is complete...
  
Screw the roof into place and ensure that you have the ventilation pipe in place so that air can circulate inside the house. In this particular example I drilled the hole and fitted the vent pipe after the house was sited as I wanted it to vent into the hedge. I was able to achieve this by fixing it to the side of the house and snaking it underground and up above ground level within the protection of the hedge. Doing this hides the pipe but more importantly in this instance I wanted to plant plants in the soil above the box so prevented the risk blocking the pipe with compost or mud.....
 with the roof firmly in place the house is buried, I also buried some rocks and logs to one side of the box where I felt is was vulnerable to stop potential predators from trying to dig it up...

Below the box is completely buried and with the vent pipe running from the side into the hedge you wouldn't know that it was there. You can just about make out where the entrance is under the branch that is providing valuable protection to the doorway...

And once completely buried I did a bit of landscaping and just need to add a few plants to complete the job and provide a secure and safe home for our hedgehogs out of the way under the hedge.... 

Well that's about as much as I can show you as far as this goes at the moment although I do want to report that my neighbour told me only today that she had found a hedgehog in their garden. The best bit was that it ran under the hedge when disturbed exactly where our Hedgehog house is so I'm sure that our 'hog-house' is now inhabited!!

If you know that you have hedgehogs or you just want to put a house in the garden 'just in case' then you really must get on with this job straightaway, you never know you could also have hedgehogs in your garden very soon!!!...

That's about it for now folks but I will be writing again very soon although haven't yet decided what my next post will be about. Don't panic as I still have lots to catch up on from the summer and that's on top of current jobs and plans for next Spring!!

As always thank you so much for reading and following my mad ramblings and I'll see you all again very soon.

Best

Higgy


Thursday, November 7, 2013

Preparing Garden Ponds for Winter and Spring Bulbs for Pollinators....

Hello All,

As promised my postings have increased and I hope that I can maintain some momentum throughout the colder months when we all spend a little more time inside!

Talking of the colder months makes us start to think about what we need to do now to get the wildlife through the winter. One crucial job that really needs doing now is making sure garden ponds and particularly wildlife ponds are kept safe for all the precious inhabitants that live in them.

I'll take you back to earlier this summer and the creation of the third pond in the garden. This was only a small pond built into the large expanse of rockery and sits next to the main seating and eating area at the top of the garden.

Only small but the new wildlife pond was built this summer and nestles into the rockery by the main seating area. Despite it's infancy it already homes frogs and Large Red Damselflies have been observed laying eggs on the plants! This means that we must protect this new habitat through the coming winter months...

So what needs doing to a small pond like this you may ask? 

Firstly I will clean out any old decaying weeds and leaves that have blown off of nearby trees and bushes. This is vitally important as if they are allowed to sink to the bottom of the pond they will slowly decompose and if the water freezes over there is a high chance of any wildlife under the ice being poisoned!

This does sound horrible but a few simple steps will help...

For most small garden wildlife ponds you can literally get down on your hands and knees and pull out the unwanted weeds and leaves. However in a bigger pond this may not be so easy and you may need the assistance of a long handled net, a long pole or even an old sweeping brush. If the liner is made of hard fiberglass material or similar then a garden rake is a very good tool for taking out these debris, but don't use sharp instruments if you have a flexible liner as the last thing you want is a puncture that will be difficult to fix!

If like me you also have a large and deep (10'x10'x5'deep!) Koi pond then you may need the use of a special pond vacuum similar to the one you can see here........      ALL POND SOLUTIONS    

You can see from the picture in this link that this really is a vacuum cleaner and you simply use it to dredge the muck out of the bottom of the pond. Most of these then allow you to return the filtered pond water back into the pond. This is an extremely useful bit of kit and worth investing in if you have a large pond with valuable fish.

Whatever method you use it is crucial that you leave the weed out on the side of the pond for a day or two so that any invertebrates that you have inadvertently removed can crawl back into the pond.

Now that you have a nice clean pond you need to protect it from any leaves that are still to fall and potentially end up in your pond starting the whole problem off again. There are several different coverings from plastic garden mesh to more elaborate custom made metal grilles that fit just under the water surface and bolt into place. All of these will protect from falling leaves and metal grilles will protect from Heron attacks also. My own choice is to use a rigid plastic plastic mesh on the two smaller ponds held in place by a few rocks but for my raised Koi pond I have opted to make my own removable covers made out of untreated wood and galvanized mesh as below...

Here are my custom fit homemade covers for the raised Koi pond. These protect the pond from leaf fall but are designed as three separate covers so that they can also be removed as required...

The beauty of these 'semi permanent' covers is they are sturdy enough to withstand Heron attacks also. This Heron landed on the side of the pond but couldn't fish out the fish....

The fish will also become really confident under this sort of protection and can still be enjoyed....

Also think about how you will prevent the water from freezing up and this is especially important on small, shallow wildlife ponds. You can buy low energy heaters that consist of an element surrounded by a buoyant material such as polystyrene that floats in the pond and keeps just small area of water clear from ice allowing room for the poisonous gases to escape. On my smaller ponds I literally cover half of the pond with thick marine plywood board, this prevents the water underneath from freezing and also adds protection to fish and amphibians that will have slowed down and become much easier for predators to catch in the cold weather. 

IMPORTANT: If your pond should freeze over never break the Ice by hitting it as the shock waves sent through the water could distress or even kill wildlife in the pond. Instead use a pan of boiling water sat on top of the ice to slowly melt a hole through. If you do nothing else float a small size football or similar in the pond that can be retrieved following a freeze to expose an area of open water.

Hiding places for amphibians and insects to hide in around the edge of the pond are also invaluable. Both of my wildlife ponds have loose rocks around the edges that provide perfect resting places for toads and newts to hide under...

The use of loose rocks when building both of my wildlife ponds has created great habitat for overwintering frogs, toads and newts to hide under. Many invertebrates will also take the opportunity to overwinter here...

Also consider what hiding places there are in the garden as many amphibians will leave the pond and it's immediate surroundings, like this juvenile newt found hiding several meters away from the pond. In this situation a well place log pile can help...
Please do try to keep water available to birds that will now visit your garden. A small water feature such as this old sink can be a great way to provide water for them to drink from and of course bathe in. Being small it is also easy to keep ice free and maintained throughout winter...

I think that this is about as much as I will say on this subject now and I do hope that it has given you a few tips of how to get your own ponds ready for winter.

Moving on and looking forward to next Spring, I recently spent a whole day planting bulbs that I'm hoping will burst into flower next Spring and provide lots of nectar for early bees and other pollinators. 

A selection of a few of the several hundred spring flowering bulbs...

As our garden sits on the edge of moorland which consists of extremely low lying marsh grazing land it remains extremely wet throughout the winter. This wetness makes planting bulbs extremely difficult as they have a tendency to rot and this is why our Spring garden has been poor so far.

Despite this problem there are things you can do to maximise your chances of success such as plant using plenty of grit in the planting holes for extra drainage. Since we moved in nearly four years ago I have been adding organic matter, grit and sharp sand to the soil to try and improve it generally. Anything else added at the time of planting can only enhance what we have started to achieve so far.

Crocus is one of the best early pollinating flowers and I have chosen several varieties purely for their 'pollinating' abilities. I have planted these under the lawn alongside Fritillaria meleagris (Snakes Head) and here's what you will need and how I do it....

Because the garden is situated on wet and heavy clay I use plenty of grit when planting bulbs to help drainage and prevent rotting...
Good quality compost will also be required....

I then mix the compost and grit together in a big trugg at a ratio of about 50/50. If you have better soil then you may be better with a 70/30 mix or similar...

 Chop a square in the lawn using a spade and peel back the sod. I the put a layer of my compost and grit mix in the bottom of the hole and place the bulbs randomly on this mix....
 Once all the bulbs are in place I sprinkle a bit more mix around them and then gently replace the soil and repeat until I have used all my 300+ bulbs.

As you can see from the above this is a simple way to add bulbs into the garden in a natural way. As we don't mow the lawn during spring these bulbs will come up and mix with the clover and add some much needed nectar for early pollinators.

 Fritillaria meleagris (Snakes Head) are superb for naturalising in a damp meadow or lawn...

Here is a list of other spring flowering bulbs that I have added this year and I recommend for pollinators...
  • Crocus chry. Romance
  • Crocus chry Gypsy Girl
  • Crocus chry Advance
  • Crocus chry Snow Bunting
  • Crocus Sieberi Tricolor
  • Crocus Tommasinianus Whitewell
  • Crocus chry Cream Beauty
  • Anemone Coronaria
  • Anemone SR Mr Fokker
  • Allium SR Cowanii
  • Allium Sphaerocephalon
  • Fritillaria meleagris
  • Ornithogilum Umbellatum
Camassia is another interesting addition to a Spring garden and will naturalise easily in damp conditions. It will also tolerate dry ground in summer which makes it perfect for the garden here. I planted a few two years ago and last Spring they were visited by early Bumblebees so I have bought three different varieties to plant this year. This is a bit of an experiment as I want to see if any varieties are better than others at attracting pollinators! As well as the common variety I have added a white variety and another named Camassia Esculenta.

I've had some success with Common Camassia attracting Spring pollinators so have planted three varieties this year to see which is best for pollinators... 


 Well that really is about it for another post and I do hope that this has been of interest to you and given ideas of what you can plant planning forward to next Spring to ensure that we are all doing our bit for garden wildlife...

Please do continue to send me your comments and feedback as I am always pleased to receive them and will of course reply to all that are sent.

Best

Higgy

Tuesday, October 29, 2013

Garden Seating a Raised Bed and Patio Make-Over!

Hello All,

You are probably feeling confused at another post so soon after my last one about moth trapping and both of them following such a long gap!!

Well as I said in my last post I have lots for you to catch up with but at the same time it's that part of the year when you also start to plan forward and decide what projects need doing or certain areas that need a make over or complete overhaul.

Before we go back in time my plans to take forward into next year and from things experienced this season is to find some comfortable and good looking garden furniture. You may have noticed from past postings and pictures that our main seating and outside eating area contains a large oval shape white plastic table and chairs set. Although practical it looks downright UGLY!!!

As a reminder here is a picture of the nice secluded seating area that I worked hard to create...

Our main seating area is situated below the Koi pond and is tucked away behind the trellised raised bed that in the height of summer is full of tall and lush planting making a nice natural screen. A small wildlife pond here also adds extra interest but it's a shame the same can't be said for the white plastic 1980's patio set!!!....

So first plan for next year will be to get rid of the 1980's white plastic patio set and get something a little more attractive and in keeping with the garden. Initially I have been looking on line to see what is around and to get an idea of what would fit into the style of our garden. With wood featured throughout the garden initial thoughts are to go with a wooden picnic set with attached seats similar to the furniture supplied by the company here... 'The Garden Furniture Centre'
Please do take a look and let me know what you think would fit best?

Going back in time to August of this year and to a little project that I completed one weekend, not so much for wildlife but to tidy up a certain area of the garden and tie it into other recent landscaping jobs. As I have said on numerous occasions although the garden is for wildlife and we are extremely proud of what wildlife it has attracted so far, it has to be used as a family space and we like it to also be an attractive space. With this in mind I decided that it was time to tidy up the area by the raised beds on the old patio and will take you through this project step by step below...

I have been keen to tidy this area of old patio up for some time and have been slowly utilising this unused space with the addition of a raised vegetable bed and a cold frame to bring on plants in. However it still remains an unattractive and drab concrete space!!...

In true Higgy 'recycling' style I also managed to 'liberate' some old scaffold boards that had been sawn in half and were destined for the fire place! 'I've got just the job for them' I thought to myself before asking if the builder if I could have them!!.. 

   With a rough plan in my head and with a few old scaffold boards I set to work transforming this ugly concrete space into a much nicer 'softer' looking area and of course creating a little extra planting space at the same time! (well you still have to think about the wildlife a bit and add some pollinating plants wherever you can!!!)

The boards were simply stacked into place on top of the existing patio which provided a firm level base that I knew drained adequately...
In a many of my garden projects I use this galvanized building strap to fix together wood especially inside structures such as raised beds where it can be hidden out of sight. The beauty of this strap is that it's readily available from any builders merchant and you can easily cut it using tin shears and it comes pre-drilled!!
Once a piece of the builders strap is cut to the required length simply screw it into place using some good quality exterior wood screws. I generally use about four screws depending on the size of the pieces of wood being joined....
The inside of the raised bed is then lined using old compost bags, this protects the wood from rotting and also helps to retain moisture in the compost....

With the raised bed finished and lined with polythene I filled it with a mixture of compost and well rotted manure and planted it a few different plants. As it needs to be a big feature it has been planted with a nectar rich Hydrangea and some Japanese anemone for autumn pollen and colour. Also planted is some bamboo to help act as a bit of a screen and a Arum Lilly to help tie it in with slightly leafy jungly look in this part of the garden,
Despite the new raised bed this part of the garden was still an old concrete patio that looked drab and made for quite a boring floor surface that still didn't really tie into other works recently done here like the rockery and plum slate detailing in the seating area below.

Despite the new bed and planting this area still looked drab and boring...

It was now that I decided to go the whole hog and sort this 'boring flooring' problem out also...
Due to the problem we have with horsetail weed I decided to keep the firm level base of paving slabs as they provided a good solid base to work from and also offered a strong barrier and good resistance to these dreaded weeds.

The first stage of my new slate path was to fix 'runners' to the concrete slabs... 
  This was done by drilling through the wooden runners and then drilling and 'raw plugging' the concrete pavers which were in turn screwed down onto the floor....
The wooden runners were spaced evenly to look attractive but to also help to keep the slate aggregate in place.

Once all the runners were screwed securely in place plum slate was spread out between them.... 
The combination and contrast of the wooden runners and plum slate really make this whole area much brighter and add much needed interest....
 In this last picture you can really see how this simple make over ties this area into the rockery and  seating area below. By using the same materials it creates real flow through the two areas and links them up in a smart and modern way....  

So that really is a quick fix on a drab and boring and under used area of the garden. We included some salvage and recycling with the scaffold boards and ended up making I think an interesting and much smarter area than now blends seamlessly into the next part of the garden. One thing that I really wanted to achieve in the garden was completely different spaces and areas that did their own thing yet still linked effortlessly to their neighbouring areas. I think in this case we have managed this as there is a lot going on in these spaces including, Koi pond, Vegetable bed, Flower beds, Wildlife pond, Rockeries and of course the garden's main seating and entertaining area! Yet somehow all these different aspects and features work wonderfully with each other now!

This probably concludes my mad ramblings for this time but I do hope that this has given you a few ideas about what you could also achieve in your own garden, with not a great amount of work, on a small budget and in just a space of a weekend!!

Next time I will report on a few more of the summers past tasks in the garden and of course some more wildlife visitors. Planning forward will include some spring bulbs I've chosen for early pollinators also.

My leaving picture is a view of the large perennial pollinating border taken in October. Even now it still holds a lot of colour and flowers providing nectar for late bees, butterflies and other pollinators....


As always thanks for reading I hope that you have enjoyed it and found some interest in this latest project. Please do mail me with your thoughts and comments as I always love to read them and will of course answer all messages that receive.

Best

Higgy