Monday, September 1, 2014

Easy Build Bridge for Child Friendly Wildlife Garden...

Hello All,

Yet again I start another blog post a long time after my last post and as is usually the case the good weather has seen my time spent in the garden and not on the computer writing about it!

Although I much prefer my time outside I felt that I must come on and update you all on my wildlife pond and show you a new feature built for my daughter recently.

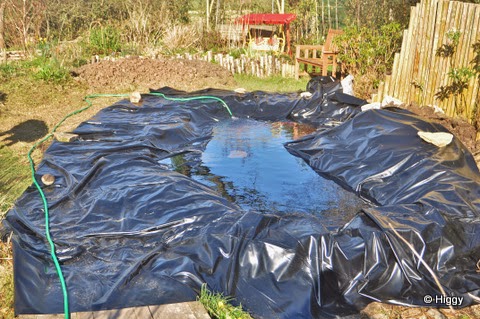
Before I tell you about the new child friendly feature I will give you a quick update on the pond that you will know from previous posts was dug this Spring.

 So at just six months old you can now see that the wildflower planting around the outside of the pond has really taken off and gives the area a nice natural feel. The planting inside the pond is also adding to this feel and providing a great habitat for variety of animals and insects...

Visitors to the pond...
 Last time we spoke about the Damselflies but now these have made way to Dragonflies that are also depositing eggs into the pond. Above is the plentiful Common Darter and below is a Migrant Hawker both seen in the garden around the pond....

Although my Blackbirds still bathe daily in the pond all sorts of birds use the facility to wash and drink from like this thirsty Greenfinch...

I always talk about my wildlife and the things that I enjoy in the garden but for some time I haven't mentioned my daughter in this blog!

If you cast your mind back to my first post one of the key things for this garden was to demonstrate that you can have a wildlife garden that is family and more importantly child friendly!

Of course my daughter has her play area with slide, climbing frame and trampoline etc but like all young children they get bored and desire other things to keep them active and entertained.

This presented me with a bit of a challenge as I was also looking to find a little more planting space so building new play equipment would take up space that could be planted in!?!...

Cost is of course always a factor and in the current climate we really couldn't afford to be buying brand new equipment or even materials to build something.

After much head scratching and discussions with my daughter as to what she wanted it was decided that building a bridge into her play area would be just the thing to add a bit more fun to her part of the garden! I could also see this as an opportunity to provide more planting space by creating a pollinating flower border the complete length of the play area and using the bridge s a means to get over the border and into the play area, how exciting!!...

Materials!!??...

Now this was a question! obviously wood would be first choice as it fits into the theme of the rest of the garden. Also I had a large pile of reclaimed roof-joists in the garage just waiting for a likely project!! These joists are 3x3inch and between 6-8feet long so I would need to be creative in my design but at the same time wanted to show how someone could make a really simple but effective 'play-bridge' feature out of reclaimed materials....

So first job was to sort out how many lengths of wood we would need and cut them all down to about the right size. I left the pieces that would be used for the steps slightly over sized so they could be 'adjusted' as required. This is also a good time to get the kids involved and once cut my daughter and I spent about two hours in the garage painting each piece of wood. This has two effects; the first being that you get a protective covering on every side of each piece of wood. But it also makes your children feel like they are really involved in the building of these play features with you!!....

So once the posts had been cut and painted we ended up with a wooden jigsaw like this...

 To get started on your bridge lay the small base pieces on the ground where you want the steps to be located whilst using one of the longer lengths to ensure that they are in the right place at both ends of the bridge...

Once happy with the position of the base pieces of wood start building your bridge 'dry' without screwing anything together or using any fixings at this stage...
 Building the bridge 'dry' like this enables you to make adjustments as you go along to ensure that you get it in the best position possible. You can see by the picture below and above that the design is a simple 'stacking' of the various pieces of wood. It is at this stage that you could decide to add extra pieces to make your bridge higher or as you can see here trim pieces to ensure they fit in the space correctly.....
So now you have the base of the bridge fully assembled. You are 100% happy with it's positioning and have made any adjustments or cut pieces of wood that required it you are ready to proceed to the next stage....

DISMANTLE!! Yep that's right you now need to take it all apart again! Now a word of Warning here. When dismantling do it piece by piece and very carefully. What you don't want to do is move your base pieces as they are in the exact position where they need to be to support your new bridge!...

Having not disturbed them cut around your base pieces with a sharp spade and then dig out the area where the bases will sit..... 
Back fill the holes with concrete and reset the base pieces into the concrete using the end of a lump hammer handle to gently tap then into the concrete mix. Important - At this stage you must use a spirit level to ensure that the base pieces at both ends of the bridge are level or as I did just very slightly off level to allow drainage of water along the bridge.

Once you have got to this stage and the base pieces are firmly concreted into place it's a simple matter of following the above process but screwing each piece of wood into place and into the piece below. For ease I pre drilled and countersunk every piece to ensure a nice even and neat finish.

You now have the base of the bridge finished and fixed firmly in place....

The final part of the build is to add some handrails to make the bridge safe to use but to also make it look a lot more 'bridge like'

To add handrails simply get six round stakes (like the wooden stakes that are often used in fencing or to stake trees) and cut the spiked end off of two. Put those two posts aside and hammer the other four into the ground right next to the bridge. Use a tape measure and spirit level to make sure that they are evenly spaced and level and then drill and screw each leg onto the bridge base as below.... 
Hammering the post into the ground is for safety reasons to make sure that the rails are solid and any children leaning on them aren't going to cause them to collapse. Make sure that they have had a couple of good coats of preservative to slow down any rotting of the posts.

Now take the two 'spikeless' posts and lay them along the upright posts on one side of the bridge and mark with a pencil where each upright meets the rail. Using a chop saw it you have one cut the section between each pencil mark out to create a shallow grove the width of the end of the upright. Once cut out simply lay back along the two uprights so they sit in the groves and screw a long screw down into the upright to fix the handrail firmly into place as below. Then simply repeat this process on the opposite side...
At this point add another lick of paint and remember to paint the ends of the pieces of wood that were cut earlier. This obviously makes the bridge look finished but more importantly helps prevent the naked ends from rotting...

So there you go a really simple and quick way to build a garden bridge and of course another fantastic feature in our child and family friendly wildlife garden. The size and height of the bridge is only limited by your imagination so why not have a go and bridge a flower border like I have rather than have a boring path or bridge a garden pond and then paint it whatever colour you want!!...

 The finished bridge built in just one day!...

As you have seen from other posts I used the same design for the new pond and it works well over water also!!...

That's about where I have to leave it this time but I will leave you with my Top Tip...

TOP TIP - My bridges have been built using reclaimed roof joists from a builder that I know. This is a very cheap way to source timber for this sort of project as the price of tips has escalated recently meaning that many builders are more than happy to create extra space in their skip by letting you have some wood! Just remember that you can't help yourself and must always ask before taking away anything such as this. 
The only downside is that the timber won't be treated so will need painting or a few coats of wood preservative but what a great way to recycle and if your really lucky Freecycle!! :-)

See you next time

Best

Higgy 


Thursday, June 19, 2014

Wildlife Pond, Wildflowers and Wildlife. Now that's Wild!!....

Here we are again but two moths on since my last post, which I can only apologise for! My lack of writing should actually be seen as a good thing as it generally means that the weather has been good and I've been out enjoying the garden!! I'm pleased to report that this is the case and I have plenty to tell you all about.

So with skin tanned and muscles stretched from all the recent hard work here's an update on the new wildlife pond from where we left it in my last post.

Two months is a long time in nature and just look at how the pond has come on in this time....

Three months after the pond was started it looks really settled with the wildflower area starting to come into bloom around it....

Another view of the pond as it is now, it will continue to improve as the summer goes on!!

 The two pictures  above and below hopefully help to demonstrate how the design of the pond fits into the wider landscape in this part of the garden and will in time look really natural....

With the pond starting to mature really quite quickly I needed to concentrate my attention on the wildflower area that sits along side the pond and will in time surround this water feature making it a little oasis for passing wildlife.

Below I will cover some of the wildflowers that I like to use and I will also try and let you know what wildlife species they attract....

Corn Marigold is one of my favourite wildflowers as it is simple to grow from seed, flowers all summer if deadheaded but best of all is a magnet for hoverflies. We all often forget what important pollinators hoverflies are. I also mix Corn Marigolds in with my perennial plants to provide pollinating bedding plants!!

Common & Greater Knapweed are both superb pollinating wildflowers adored by bumblebees and many butterflies (Large Skipper pictured). As with corn marigold I use them in among my perennial planting schemes and as they are perennial themselves they come back every summer! I like them mixed with Helenium where they make a great mix for Gatekeeper butterflies among others.

Californian Poppy isn't a native wildflower but it's bright colours act like a beacon to passing pollinators which may come down and feed on more suitable flowers. They do however attract some of our smaller flies and hoverflies....

Oxeye Daisy is a cheery early summer plant loved by most pollinators....

Toadflax is a superb bee plant loved by all types of bee. The purple variety is a native wildflower often pulled out by gardeners as it seeds and grows freely but often not where it's wanted! I love this as a bee plant and let it grow where ever it wants! The variety pictured is a cultivated pink form and I have found this to be just as good for bees so worth adding to the wildflower garden.

Wild Mignonette is loved by bees and a food plant for some of the white butterfly caterpillars...

Forget-me-not is one of the most underrated flowers for early pollinators and again pulled out by many gardeners as a free seeding invasive pest! It is one of the earliest flowers along with dandelion that offers pollen for lots of species. In this picture you can see it also offers a hiding place for predators like this pollinator eating Crab-flower spider... 

Birds-foot Trefoil is probably our best butterfly plant attracting many different species including this Brown Argus and the Common Blue among many others...

Perennial Flax is a strange one as it shouldn't really grow on my heavy soil as it's a chalkland plant but it seems to be doing well and will attract pollinators...

Cuckoo-Flower is a spring wildflower of damp ground and is superb for Orange-tip and Green-veined White butterflies. It grows well on our heavy clay soil here....

Mixed Grasses are vitally important to include in a wildflower mix as there are many species of moth and butterfly that lay their eggs among the grass and then their caterpillars feed on it.... 

Corn Chamomile is from the daisy family and is a little annual plant that will self seed and is visited by bees and other pollinators....

Cornflower is a blue flower that everyone knows, visited by bees and other pollinating insects but there are other colour variations such as this white version...

Field Scabious is simply superb for bees and butterflies. I have actually found that all Scabious species to be top rate pollinator plants including cultivated versions that can give you something a little different....


The above demonstrates a small selection of the wildflowers that we have growing in the garden and most are in flower now. As the season moves on more will come into flower providing a rich source of nectar for pollinating insects. I will post up another selection of my favourite wildflowers that I grow here in future posts. I hope that these at least give you a few ideas for your own patch.

Before I leave I will post a small selection of wildlife that has been visiting this area of the garden and the new pond....

The new pond has attracted really high numbers of Damselflies and I'm including a selection below so that you can see the difference in colouration and the difficulty in identifying species....

Azure Damselfly
 Azure Damselfly
Azure Damselfly
Azure Damselfly
 Azure Damselfly
As you can see the Azure Damselfly comes in many different colour forms!

Here are other types that visit the garden....

Blue-tailed Damselfly...

Large Red Damselfly

Common Blue Damselfly...

Dragonflies showing in the garden at this early stage of the summer are...
Broad-bodied Chaser....

And Southern Hawker....

There have been lots more exciting sightings in the garden over the last couple of months but unfortunately too many to list on here. I will leave you with a picture of our latest success story which has been the arrival of a family of Hedgehogs! This is really great news as the Hedgehog is under major decline and I know that we have a family of at least 4 hogs! 

One member of a new family to the wildlife garden busily mopping up fallen meal worms that have proved irresistible to the hogs!...

That's about it for this post so I will bid you all farewell and many thanks for taking the time to read my blog. Please do feel free to comment or pass on any suggestions that you may have for the blog or my garden.

Best

Higgy


Tuesday, April 15, 2014

Wildlife Pond Build Continues and Leads to an Early Bath...

Hello All,

Once again time has got the better of me! But I have been out making the most of the good early sunny hot weather. It certainly beats all the wet weather that we had over the winter time and it's not only me who's been out enjoying the weather but the wildlife also, which is once again starting to wake up in the garden.

To pick up where we left off on the last post I will continue to guide you trough my main project at the moment which is of course my wildlife pond build....

On the last post we left the build just as we had finished excavating the actual pond. Being for wildlife the pond doesn't need to be to deep but I still like to have an area somewhere in the pond that is at least two foot deep, this deeper water gives a safe area for insects and amphibians to over-winter in if we should get cold winters. In a wildlife pond you wouldn't generally keep fish but I will mention here that if you do build a pond with the intention of keeping fish then the pond should be at least three foot deep. My own opinion is that it should be at least four foot in some places for fish keeping.

So here we go then....

Once excavated I crawl around inside the pond and remove any stones or roots that I can see and which could potentially puncture the liner. 

There are various types of liner and my first choice would normally be EPDM  which is a tough lining material with all the attributes of a butyl rubber liner but at less cost. Unfortunately current finances meant that I couldn't afford EPDM and I've opted for a PVC liner of a good quality. To help protect it I have also purchased a good quality pond liner underlay...

Once the layer of sand about half to one inch thick has been added around the whole pond and firmed in I add the underlay ensuring that it overlaps well where there are joins. I attempt to get a minimum of two thicknesses across the whole pond area.....

Now it's time for the liner but prior to fitting it pays to lay it out flat on the lawn in the sun, this warms the liner up and makes it more pliable and therefore easier to mold into place....
I actually laid this liner on my own but it does pay to have a few people on standby ready to help!!

Then run a hose into the pond and let it gradually fill up. Whilst this is happening you must be present to neatly fold and neaten creases as the liner molds around the contours in the pond. If you don't get it neat now then you won't be able to make adjustment once filled as the weight of the water won't allow you to change how the liner lays...

Trim around the edges but be careful to leave a good overlay as when fully filled the water could still pull down the liner a bit more...

Now you are ready to start thinking about the landscaping around the pond and how to hide the edges of the liner....

I decided to add a bridge and this was simply added by concreting some wood into footings on each side of the pond and then once dry screwing some 3"x3" posts across them as below...
This simple bridge was made out of some old fence posts and now creates a walkway to the seating pod...

I decided to hide the edges of the pond by putting large rocks on the upper shelf and then back-filling the space behind with a mixture of clay soil and fine gravel. This makes the perfect planting medium for your marginal plants....  
Note that I re-used the clay from the excavation and mixed it 50/50 with fine grit, this is perfectly OK to do and will save you a lot f money over buying unnecessary pond compost.....

So here is the pond once the marginal landscaping was finished...

At one end I have included a shallow beach area that allows easy entry / exit to wildlife to safely use the pond. This is especially important if Hedgehogs fall in the pond to ensure they can get out....

As if giving this new feature it's seal of approval my resident Blackbird has taken over the job as security guard for the pond and uses it at least twice a day for his morning and afternoon bath!!!!....


Although I have already started planting a few wildflowers around the pond and preparing areas to put back to wildflowers and make up for the lost area from creating this new feature, I will leave this update until my next post. This should give plenty of space to give you the names and pictures of the plants that I intend growing to attract all of our beloved pollinators and of course in the hope of attracting a few more new species into the garden!

This just leaves my usual round up of what wildlife we have been seeing in the garden over the last few weeks.... 

Sticking with the pond theme what about this magnificent Great Diving Beetle - Dytiscus marginalus. A first for the new pond and a first for the garden!!... 

I make no apologies for posting up another 7-spot Ladybird as they are so numerous in the garden which is great!!...

Although common a new recording for the garden was this Bee Fly - Bombylius major
Another new record, Sloe Bug - Dolycoris baccarum....
 Not a new hoverfly for us but welcome none the less was this Syrphus vitripennis

It has been a great year for us in terms of birds, not new species but great numbers of our regular birds with the highlight for me the continued daily presence of our Reed Buntings - Emberiza schoeniclus.....

These green / blue beetles are called Chrysomelidae Alticinae and were in good numbers and breeding in the garden last month.... 

Finally it is absolutely brilliant to see the return of our hedgehogs and they are actively feeding in the garden and seem especially partial to my dry meal worms that I put out for the birds! 

Hedgehogs are in serious decline so I'm really pleased to have the back in the garden again. I'm hoping that my hedgehog houses have helped by giving them a safe warm place to overwinter in. I can't check the boxes as they are buried under the hedges in the garden to provide safety and extra warmth for any hedgehogs that are using them but live in hope that they have helped.

Despite having posted my plans for a home built hedgehog house on Facebook recently, here they are again for anyone else who wants to help save our hedgehogs by providing shelter in their own garden....


So that's it for now, next time I will update you on the planting in and around the pond which will include my wildflower area which is currently going through a complete re-vamp!

As always thanks for reading and do please keep your comments coming in as I will always answer them and continue to enjoy chatting with you all....

Best

Higgy