Thursday, October 27, 2011

Garden overview - how have I done so far?....Part two...

Hello All,

here I am again with the second part of my overview of the garden and the work completed so far in the 18 months that we have been here.

From part one you will know that I have covered the first six items on my wish list, which was a rough form of objectives for this project for me to aspire to. We covered quite a lot of ground in the last post and I'm hoping that this second group of objectives will be as successful as the first six!

So to remind us again here are the 12 objectives....

  1. Child friendly and interest
  2. Dog and pet friendly
  3. Construct a fish/koi pond
  4. Make safe and modernise the raised patio area
  5. Keep the sense of size and openness of the plot
  6. Create a sense of intimacy and different areas of interest in the garden
  7. Open up the country side to the rear of the garden
  8. Encourage wildlife in the garden
  9. Make it look nice
  10. My desire to use ALL types of plants from cottage garden to tropical jungle type planting!
  11. Use recycled material where possible
  12. Enjoy it!
Part two...

7. Open up the countryside to the rear of the garden.

When I first wrote this objective I don't think that we really realised what a great view we would get by trimming the overgrown trees and Hawthorn hedge at the bottom of the garden. We bought the house as it had a good size garden and access into open countryside which in this case is quite flat moorland.
So was the idea of levelling the hedge and trimming the trees to create three open arches a success?...
Well I think it was and will leave you to decide for yourselves with a picture of our view through the natural arches created last year?...

Below how it looked when we moved in, note this is shot in late winter and despite the oak tree having no leaves we have very limited view!

And two pictures below to show how it looked after our initial work...


I have to say that I am pretty pleased with these results and having sat on the raised deck with a beer on a summers evening it is a roaring success to me, what do you think?

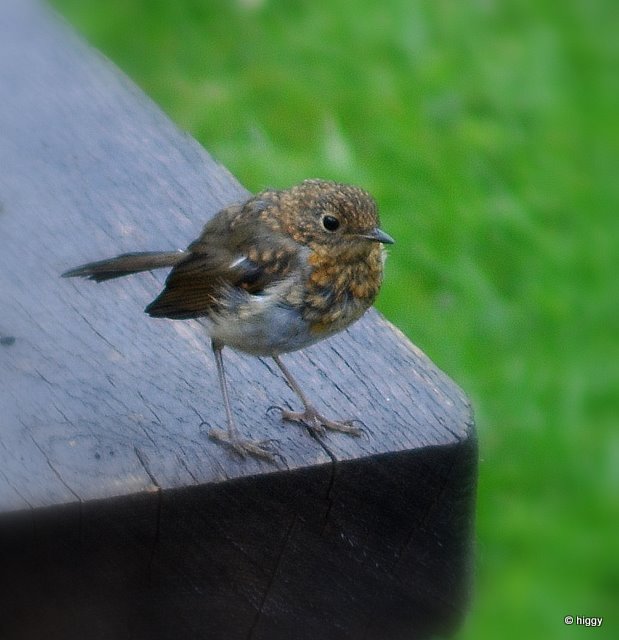
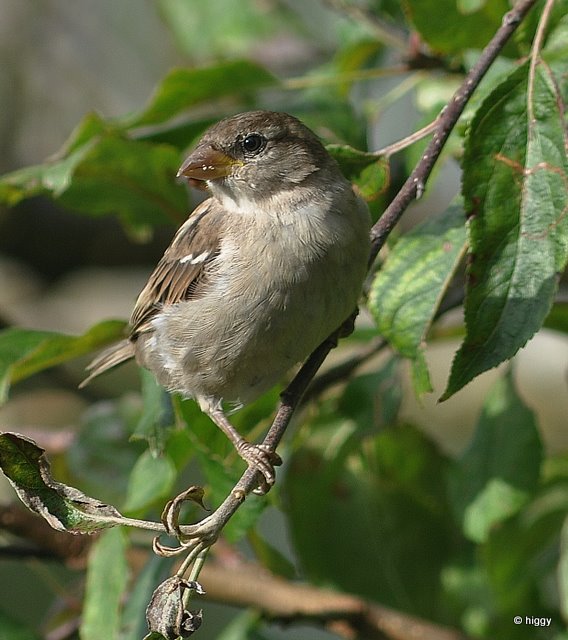
8. Encourage wildlife into the garden

Well I could write ten posts about this as we have been blessed with much more wildlife than we could have ever hoped for. The garden is yet to mature so I can only presume this will get even better as time goes on. I'll keep the words short and post up a few pictures to see how we have done...

A small section of the wildlife area which was largely constructed using recycled branches from the 'trimmed' trees
This area blended in nicely with the wild flower lawn which this year was extremely successful at attracting all sorts of bees, butterflies and other insects..
The small log pile is gradually growing and I hope is home to a variety of insects...
The bird count has reached 36 and we had a welcome return of Sparrows who this summer numbered well over 30 in their newly formed flock!..
And of course countless butterflies and insects...

I'd say the start of a big success and possibly one of the most satisfying parts of the project so far!

9. Make it look nice +
10. My desire to use all types of plants from cottage garden to jungle type planting

I've put these two objective together as they go hand in hand, I hope by using good and varied planting schemes it all pulls together to make the whole garden look nice?....

The top lawn is more 'manicured' than elsewhere however to help early spring bees I allow clover to grow and flower in spring which has been very effective in attracting early bees to the garden. the borders here are a mixture of cottage garden perennials and a few other shrubs and grasses
To full fill my passion for exotic plants I created a raised bed of sleepers to 'echo' the pond design. here I grow bananas, cannas & bamboo amongst others. This year I also added 'hot' colour by using Rudbekias   
The shade garden below sits alongside the lawn and perennial border and is home to a seating area under the branches of a clematis covered tree. Planted here are heucheras, ferns and hellebores.
The area surrounding the old stone bridge and stream bed has recently been planted with a variety of grasses, sedges and irises to help soften the edges and link the more 'formal' planting above to the wild-flower lawn, it will be interesting to see how this develops..
The newly planted grass beds above should run seamlessly into the wild-flower area where this summer we had, Corn Cockle, Corn Marigolds and a variety of Corn Flowers growing amongst other wild flowers who have sowed themselves into this area!

So, does it look nice? I think so but still looking forward to everything maturing and growing in size a bit more! Have I used the variety of plants I wanted? Again I am pleased with this so far but can't wait to add more species as time goes on!

11. Use recycled materials where possible

This was the one I was the most sceptical of but in fact it has worked out much better than I could ever have expected. Once I got into the 'recycling' frame of mind I really got into it and managed to 'blag' all sorts of materials from a variety of 'free' or very cheap sources!

The rocks and stones I used for the feature rockeries and the 'new old stone bridge' all came from 'free to collector' adverts....a bargain!

Branches pruned out of trees and shrubs were recycled into hurdles and other landscaping features


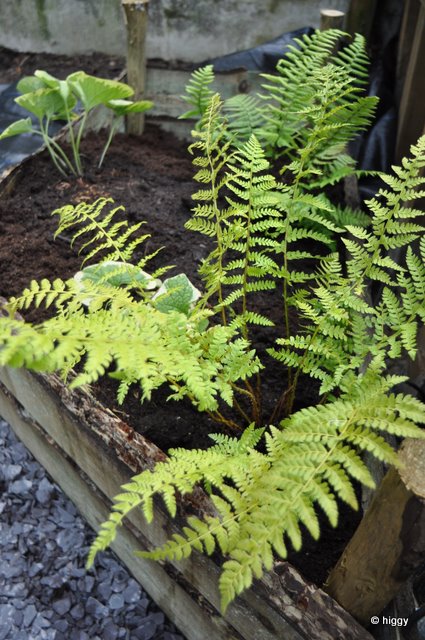
Redundant wheelbarrows have become features and planters have been created from old decking planks including the raised vegetable beds below...

I think a gallant effort has been made to used recycled materials as much as I can but as everyone else we can all do more! I know that a massive percentage of landscaping has been completed purely down to the cost saving from the cheap and free materials I have acquired!

12. Enjoy it!

That's easy, of course I've enjoyed it and I hope you have been enjoying it also!?

So to conclude it's been 18 months of hard but enjoyable graft, I've successfully completed some of the ideas I had before starting out and I have also completed many other things, which have evolved as the work has gone along! I have been so lucky to have this opportunity and have enjoyed every second of it. The wild life which has been encouraged to come and use the garden has given the whole family so much enjoyment and we are looking forward to see what else moves in over the coming months and years! My daughter has her own play area and even her own planting bed, watching her enjoying it whilst learning about the garden, plants and the rich wildlife which we are so fortunate to be able to enjoy here feels me with joy. I think that I can say that so far it is a huge success and my objectives and targets have been reached as far as they can in the limited time that we have been here.

So what next?....

Well there will be plenty more to create as well as the usual 'tweaking' of the projects already done. On the list for this winter so far are:
  • finish decking are behind pond
  • create a small wildlife pond and bog garden
  • construct two sleeper raised beds for more veg space
  • erect some trellis fencing
  • tackle the front garden and repair cobbled drive
  • build my compost boxes
  • and of course...enjoy it!!!
As you can see I still have plenty to do to keep me occupied so I'll see you next time when I'm sure something else will have changed or another project started!

Cheers

Higgy


Thursday, October 6, 2011

Garden overview - how have I done so far?....Part one...

Hello All,

Well what a busy summer I've had with several projects finished others started and finished and some just started!
Now that Autumn is here the flowers are fading and the ground and weather will start to get cooler. Things in Higgy's garden do seem much calmer now after a busy and frantic summer! I feel it's the ideal time to reflect on the work completed so far. Now would also be a great time to take another look at my wish list which I included on my very first post to see if I have ticked off some of the things I wanted to achieve in the garden.

So here is the original wish list from my very first post and I suppose my 'plan' for the garden:-


  1. Child friendly and interest
  2. Dog and pet friendly
  3. Construct a fish/koi pond
  4. Make safe and modernise the raised patio area
  5. Keep the sense of size and openness of the plot
  6. Create a sense of intimacy and different areas of interest in the garden
  7. Open up the country side to the rear of the garden
  8. Encourage wildlife in the garden
  9. Make it look nice
  10. My desire to use ALL types of plants from cottage garden to tropical jungle type planting!
  11. Use recycled material where possible
  12. Enjoy it!


So from the top of the list...


Part 1 (1-6)
1.  'Child friendly and interest'
I think that this is a big yes as my 4yr old daughter has enjoyed the garden immensely this year and loves to run around the various paths and play hide & seek. The seating area tucked away underneath the tree covered by a large Clematis Montana in the shade area has become her "house, shop and petrol station!" Last Christmas she asked Santa for a pink wheelbarrow so she could "help daddy in the garden" I absolutely love to see her enjoyment from being outside and enjoying the garden making the whole project worthwhile. If I have to choose a successful part of the garden  just for her then it has to be her new play area...
My daughter's new play area was a resounding success even if rain did spoil her birthday party!


2) Dog and pet friendly
Well my dog is happy to spend time in the garden, next doors cat spends 'too much' time by the bird feeders until the dog see's her! So I would say yes.
Choco dozing on the patio....it's a dogs life!

3) Construct a fish/koi pond....
Yes a massive success and the first 'proper' landscaping job I took on. My fish were on holiday at a friends house so speed was very important on this project. The fish soon settled into their new home and the Golden Rudd have successfully bred in their first season which I think is a big thumbs up from them!

My fish bred this summer so seem happy in their new home!

4) Make safe and modernise the raised patio area...
Again one of the first jobs to be completed as the old patio was raised with a three foot drop onto a lower patio, dangerous with a young child running around. I wanted to keep the height as this would eventually offer far reaching views over the garden and across open countryside. A raised deck was decided on to keep materials similar to the pond and for ease of construction...

The raised deck fits in well with the pond and is a perfect viewing platform across open countryside, the addition of balustrade makes it child friendly and safe! 


5) Keep the sense of size and openness of the plot...
A difficult one to judge as the project isn't finished and the dynamics of the garden will change as plants grow up.....watch this space I think on this one!


6) Create a sense of intimacy and different areas of interest in the garden...
Yes I think that have achieved this and as above this will improve as the garden matures and more work is completed. I have tried to create different areas in the garden like the large perennial borders and then the complete contrast of the wildlife area which is much more rugged. There are various seating areas with some giving a sense of intimacy such as the home made bench in the shade area tucked under a tree and the obviousness of our new swing seat which gives you a view from the bottom of the garden up to the house. These different areas and aspects add interest to the site and hopefully make you want to explore a little more!


Various seating areas give interest and different aspects to enjoy the garden from.
This home made log & sleeper bench in the shade area provides a private hideaway from the hot sun...
The newly installed swing seat is more obvious and gives a view up the full length of the garden towards the house and is open to the hot sunny summer weather!

Different 'themed' areas add interest and make you want to explore some more...

My stone bridge and pebble streams add a little drama to the project and help connect....
The more formal mowed lawns and perennial borders to....
The wild flower lawn and....
The wild life area!

 I think that five out of the first six from the original wish list isn't bad? As the garden matures and more importantly plants and trees grow bigger the whole space will become much more interesting and certain areas will naturally become more private and intimate. With areas still waiting development there is plenty of scope for me to be more creative and add a little drama in certain areas which I hope will be fun watching it develop.

That's about it for this post. The results of my first six wish list items have now been recorded. In my next post I will cover the last six items on the list to see if I have achieved what I originally planned or whether further work is required!....

As always thanks for reading I do hope that you have been enjoying this blog since I started it last year and watching this little part of Somerset evolve as much as I have enjoyed doing it!!?

Please do send me your comments....what do you think of it so far?.....have you got any ideas for my plot?....How could I improve this blog?

Cheers

Higgy 

Sunday, September 18, 2011

Oh Deer, horse manure and a play area.....

Well hello again and once again it's several weeks since my last post! Apologies for this but as stated on my last two posts it's that busy time of the year which keeps me very busy and limits opportunities to get on the computer somewhat.

Without further ado lets crack on and get straight into this post and update you on much of the work started, completed and not yet completed in Higgy's garden...

Last post I left you when we were right in the middle of that difficult area behind the pond which didn't really offer much other than some empty space once all the brambles and old fence had been cleared. If you browse back through the previous post we had completed construction of a raised bed walkway with plum coloured slate path. Obviously the next job for me was to fill the raised beds with soil ready for planting, my chosen mix for these beds was easy and consisted of roughly :-

1 x bag of horse manure - 'free to collector' advert!
1 x bag of Wickes compost http://www.wickes.co.uk/multi-purpose-compost/invt/200246/ (which is still on offer 4bags for £14) 
2 x bags of top soil -  'free to collector' advert!


My planting plan for these raised beds is to try and grow some very large and 'lush' types of plants to give a 'jungle/tropical' feel as you walked through the area and past the beds with the idea being that once grown the plants would be stood tall in the beds increasing the appearance of size and creating a dramatic atmosphere...(that's the madness behind my plans/thoughts anyway!!)

Although this project still isn't quite finished and is a couple of seasons away from it's planned 'drama' here it is in pictures for you....

In this picture above you can see that this area sits nicely behind the raised sleeper koi pond and the steps lead you up from the feature rockery into this area, I used the plum slate to give a nice flow from the raised bed area down into the rockery/seating area.

 Here are the steps which lead you up and make you want to explore a little further. This is the view you get from the seating area which should be quite dramatic once the plants have filled out and reached their full potential.


A couple more views (above) which again just need the plants to fill out....planting so far has consisted of several large grasses which should reach up to 1.5-2mtrs tall, a Fatsia Japonica which will form a a large bush with big leaves. To keep the 'tropical' look I have also planted an old cordyline which was doing nothing in an old pot and to get a little colour and some extra plants for this year some rudbekias which were sitting around in my cold frame looking sorry for themselves! 
Also added since these pictures were taken is a rodgersia which has lovely large rough leaves and a lovely scent when in flower and  a few more green/foliage plants for both height and ground cover.

At the top of this area will be a sunken deck with ferns (above) and hostas in as this will be shady which will provide ideal conditions for them and add some lush green foliage to keep the 'jungle' theme going and make a great experience being sat down in amongst all the plants.

This last picture gives a bit of an overview and I hope you can see where the deck will be and get an idea of how it will look once completed and all the plants have grown up?

That's about as far as I have got with this area at the moment due to my 'garden project' budget having been  just about depleted now!!....I have however now managed to source some old hardwood deck boards and framework off of a work colleagues mum which should enable me to get this finished during the next few weeks!!

Ok so what else have I been up to if that wasn't enough?.....well I have to say lots!!.....and the garden is really looking good at the moment with August being a great time with so many of my planting schemes reaching their peak during this month. I intend to take some more pictures and in my next post share some of the planting with you in more detail when I have a bit more time and space to show you.

For now I want to quickly show you a little 'unplanned' project which I completed over a weekend for my daughter recently. Now with her fourth birthday closely approaching and the plan to have a 'garden' party for her and all her friends good 'old Dad' went to work to give them a play area to enjoy, as all of her play equipment had been gradually getting pushed further and further into the hedge row!!....

Here is the new play area which sits nicely behind the new greenhouse enclosure. The area was cleared and then I used a weed membrane and finished with a good thick covering of play bark which needs to be to a depth of about 8 inches.
The trellis panels were secured into place using fencing stakes which I then rounded the top and painted them to look like giant pencils to add a bit of fun and interest for my daughter. 
The planting scheme in the bed at the front of the trellis is chosen by my daughter who wanted "pink!"  I did add a little white in as a contrast!! 
Finally a sign was added to give her a sense of 'her space' and to welcome her friends into the play area....

Well there you have it a quick and easy play area knocked up in a weekend.....simple!!....and of course you all want to know how did the garden party go????......It rained all day and we had an inside party!!!!LOL!!

That's about it for now other than to show you a picture of a visitor who I have seen twice this week in the fields at the bottom of the garden.....

 Yes we do have a lone deer who seems to be in the area at the moment and thankfully she is staying out of the garden as I know they have potential to do a lot of damage! But what a great sight from your kitchen window isn't it!?  
 (I have to confess that although taken across the fields near our house by myself, this isn't the 'actual' deer I've seen which I have yet been able to get a decent picture of!)

I think that's about it for now, next time we will look at some re-design and new planting near the old stone bridge and have a general overview of where the garden is now and how it has looked during the summer of 2011.

As always please feel free to comment as I am always keen for feed back whether positive or developmental....

Cheers

Higgy  

Wednesday, August 17, 2011

So busy...landscaping, plum gravel & raised beds plus a few feathered friends!

Hello and welcome to another round of Higgy's blog.

What a busy couple of months it has been and I've hardly seemed to have the time to get on the computer let alone write another post on here! I have so much to write about and plenty of pictures that I think I could write half a dozen posts and probably still not bring you up to date!

With the ever increasing numbers of visitors we are getting to this blog I have felt under pressure to get something written again but I have so much to do outside! I am so grateful for all your support and as ever look forward to further correspondence with some of you via the comments and emails which I am sent, please do keep them coming as I am enjoying the banter and will always reply and help if I can.

Right then where do I start!...

Well to finish off the last post would probably be as good a place as any.... here are a few photos of the greenhouse project now, It's still not completely finished but is in place and functioning in as much as I have some tomatoes growing in it currently!

I used some of my 'free to collector' breeze blocks and paving slabs to make planting and standing places inside of the greenhouse. 

Once the greenhouse was up I used trellis panels between 3x3 fence posts to screen it and make a feature out of it. The arch way through connects it to the tropical raised bed and gives access to the 'working' area created between the greenhouse and tool shed. The trellis has already been planted with three different varieties of honeysuckles so next year this should soften it's appearance and create a nice fragrant area to work in.

Right that's the greenhouse done so the question is what did I move onto next?....

Well I've had so much interest about the development of the area behind the pond I felt obliged to start this!! I am just going to remind you of how it did look and then once I have brought you up to speed on my feathered visitors I will show you the start of this project.

So here is the space behind the pond in need of development....

Right then here are my recent feathered visitors....

As always the fields and garden are filled with gulls looking for a free meal!!...

My new Robin fledgling who greedily watched me unearthing worms whilst developing the area behind the pond where it found plenty of juicy morsels to feast on...

Not the greatest picture but taken at some distance, this kestrel and it's family nest nearby and can often be seen hunting across our field and hedgerow over the last couple of weeks I have watched the adult bird teaching the young to hunt before they finally fledge .

SPARROWS!!!...well my little flock of about a dozen has now grown to in excess of 30 birds! They are polishing off a full large seed feeder a day! Here's a few of them squabbling for the seeds!!

A young female sparrow taken some time out from the fun...

Now I have been privileged to have a family of Buzzards in the trees a few fields away from our garden, they can often be seen hunting along the hedge line at the bottom of the garden and out across the fields. So far I've been unable to get a 'good' shot in the garden but here is one of (HARRY!) flying low across the paddock.... 

I have much more to post in the form of garden visitors such as butterflies and insects but these will have to wait until next time!

So here we are then the moment which many of you have been waiting for the start of the area behind the pond! My initial thoughts were to go for a tropical feel with raised deck walkways but on reflection I didn't feel the space could quite carry it off. Having used plum slate around the new feature rockery I thought the use of it for a pathing material would tie everything together and give some continuity to the designs despite their differences. I have planned to use raised beds and this hasn't changed other than the type of material used which has changed from sleepers to bark edged boards, which came from here: http://www.fountaintimber.co.uk/gate-posts-sawn-timber/treated-gate-posts-and-sawn-timber/waney-edge-board.html 

As always here it is in pictures....

So just to remind you here is the area and the steps which I built as part of the feature rockery, which take you up behind the pond....

As you can see from both this and the above picture, I have had to dig out a good amount of soil to get the levels correct and deal with the Horse tail and bind weed which were deep rooted here...

As the design was quite fluid on this project I worked a small area at a time and worked from the front into the plot which really helped me see and feel where I wanted the features go. This was a difficult design as the space is quite small so a 'little as you go' strategy seemed the best solution, by adopting this approach anything which felt wrong was easily corrected without changing large amounts of work and effort!

Due to the horrendous Horse tail weed and the added nuisance of bindweed I again used weed control membrane following digging to help keep it at bay or at least make it manageable. 
The feature path was then marked out using round posts which the boards would eventually be fixed to and create a series of raised beds...By fixing in the bottom board I was able to use the plum slate to help me visualise the flow of the path and therefore the placement of the next posts....

With the posts sunk deep into the ground with my trusty sledge hammer I was then able to screw the boards onto the posts using good quality exterior timber screws. As well as the boards being screwed into the post they were also screwed into each other where possible to give plenty of strength and rigidity to the beds.

That is about as far as I will go with this project for now as it seems a good place to break from it. I will continue with this next time where I will tell you the compost mix I use to fill the beds, show you the planting ideas for this area and the beds and of course reinstate and finish the rockery at the front. This area has been quite a challenge to work and design as it is really a dead space which goes no where. I have had to make up some of the design as I have gone along which has been interesting. As this area has thrown up a lot of interest amongst many of you I would be keen to hear your views on how I have done so far? Please feel free to comment and send me a message and comment which I will answer and maybe discuss on my next posting!!

As always thanks for reading I do hope that you are all still finding my garden ramblings interesting and enjoying my little piece of Somerset as much as I am!?

Just before I go I couldn't not show you my 4yr old's new garden HQ where she proudly keeps all her gardening tools so they are at the ready for 'helping' me out....(I'm sure child friendly and interest was on my original wish list!!!)

Cheers

Higgy