Monday, February 21, 2011

New old stone bridge opens...

Hello All,

Here we go again! I'm sure you have all been wondering what ever is that guy going to think of next?....

Well in answer to your question I have lots more to share with you before we even get up to the present day!

Before I bore you all again with my mad cap gardening a quick hello to our ever expanding audience from...UK, USA, Canada, Russia, Denmark, France, Ireland and Vietnam! I have to say we are getting a variety of readers all logging on to get the latest of how this little piece of Somerset (or as we locals like to say "Zomeerrsett") turns out!

February Has been a miserable month here with really low light levels which has made photographing the birds really tricky. I Have however had the continued pleasure of the new Reed Buntings visiting the garden which is nice to see. A beautiful Green Woodpecker has also started to put in a more regular appearance over the last couple of weeks and I have attempted to get some shots of him but he hasn't quite come close enough yet to get a real A1 shot, but to prove his attendance here's the best of a bad bunch....


Following on from the last blog when I worked on the new wildlife area and planted lots of bulbs, here's a picture of the first flowering bulb of this year (2011)...a lovely miniature iris growing out of the bank of the dry(ish) river bed..


Ok on with the gardening and I am taking you back to September 2010 again and the start of my next hair brain scheme! I have written in previous posts about my desire to recycle whatever materials I can,and to date I have told you about my recycled wheel barrow planter, landscaping with recycled branches and logs even using up old bits of sleepers to make benches amongst other things. To continue this theme and not to waste anything I have been piling stones or rocks which have been dug up out of the garden to one side for later use. At the time of digging these rocks up I didn't really have much of a plan for them other than possibly using them for a rockery or similar. Thinking about how the garden links together I wanted to build something to make the ditch running across the middle of the garden more interesting and a feature which linked in to the rest of this area. I had already recycled left over sleepers and fence posts to make a simple bridge but this still felt like 'just a few planks across a ditch'. After much head scratching I came up with the idea to build a real 'proper' feature which these rocks would be perfect for....'A new old stone bridge!' I also had a couple of sections of old concrete drainage pipe which I had found under a pile of rubbish at the bottom of the garden....just the job!!

This is the area at the end of the ditch which was a none de-script border at the edge of the lawn and ripe for some 'Higgy' development! 


As this area is in the ditch although drained it still gets quite wet in winter so anything built had to take this into account and not create a problem for standing/draining water. Therefore the base of my new bridge was built on a substantial layer of hardcore and gravel to allow good drainage. In the picture below you can see that the bridge is actually constructed above ground level with just the concrete pipe sat down into the bed of gravel.


Behind the bridge I used more gravel and hardcore to add a 12" layer of further drainage before back filling with soil which had been dug out of the wildlife area...

This picture below shows the bridge with backfilled soil, note the boards used to the side to add more depth to the shallow ditch and to help blend the finished soil level into the bordering lawn...

The soil was then prepared and planted with grasses and wild-flower seed mix which when grown up should hopefully give a nice natural feel to this feature...
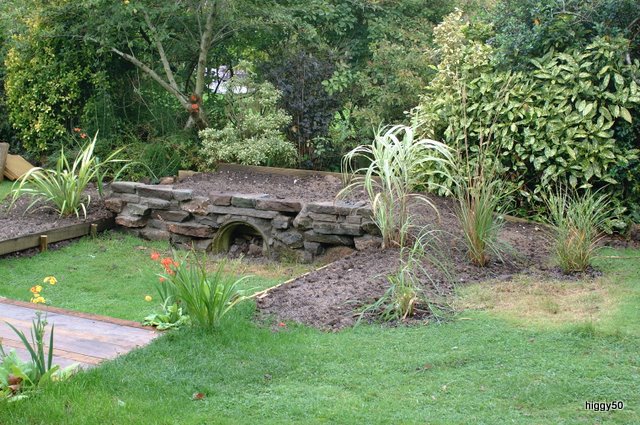
The turf from the surface of this ditch was taken up and used to create natural looking banks inside of the boards, Planting pockets were dug with polythene and soil which were then planted with a variety irises. I have planted irises which should give year round interest due to their differing flowering times. The bottom of the ditch was laid with a weed membrane and then pebbles and gravel added to give a dry river bed effect....

The below picture gives you a glimpse over the top of the bridge to the dry stream bed which runs down the edge of the garden and links into this main feature...I will cover this in more depth next time...
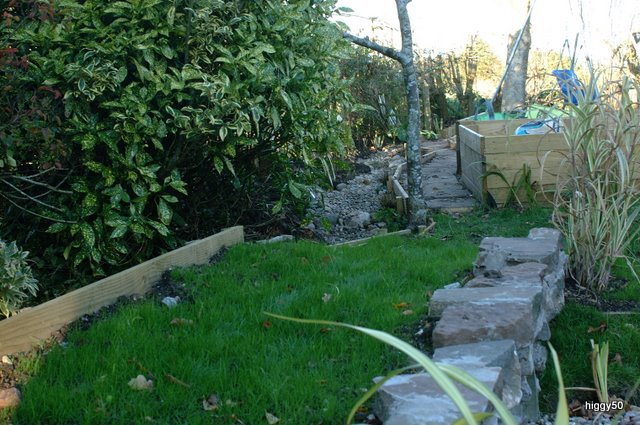
From the picture above you have had a quick glimpse of the dry stream bed and the raised vegetable planters which I will cover in more detail next time. With the weather warming up slightly I may even have some up to date gardening activities to write about! The light should also be improving as we move towards Spring so I also hope to be able to show you a few more photographs of my feathered visitors....

Once again many thanks to all of you who are logging on regularly it is appreciated. I hope that you are finding my daft ramblings interesting and please do feel free to leave comments and ideas which I would be really pleased to discuss in future posts...

Cheers for now...


Friday, February 4, 2011

Recycling & branching out into wildlife...

Hello once again it is now February 2011 and the weather is still dark and damp putting a halt to gardening at the moment. Luckily we are only half way through catching up on last years efforts so I still have plenty to talk about!

Firstly I would like to thank the many of you who have been logging on to see what mad idea I'm going to come up with next. To date as well as a large British audience we have been visited by USA, Canada, Denmark, France and Vietnam so a quick hello to you all, I hope you are enjoying my pointless ramblings and will continue to log in and see what happens next!...

Before I put you out of your suspense as to what happens with that big pile of junk from last month here's some bird stuff first....

Every January the RSPB run a survey called 'The big garden birdwatch' (BGBW). Anyone can take part in this survey by simply spending an hour watching and counting birds which visit your garden or local park. When you have the results simply send them back to the RSPB who collate them to work out which of our native birds are thriving or sadly in decline. All the information is invaluable to help with future conservation projects which makes this a nice simple way to feel like you are doing your bit for our feathered friends. The RSPB forum http://www.rspb.org.uk/community/forums/ is also well worth a visit with some great stuff on there about birds, gardens and wildlife in general.

During my BGBW I counted 20 species during the hour and was lucky to see my first Reed Bunting which also takes my own count up to 33 species seen in the garden so far!

The poor light has been particularly bad  for taking photographs recently so I haven't done too much but here's a shot that makes me smile... a greedy Pigeon coming in for landing...


Right back to the gardening and back to August/September 2010 and some nice sunny weather again!

At the end of the last blog I left you with a picture of the bottom of the garden which over the years had been used as a compost heap and general dumping area. My plans for this area were always to set it up for wildlife whilst maintaining interest and giving a natural flow an link with the open countryside beyond. Also in my very first blog entry I said that I intended to recycle what ever materials I could whilst constructing this garden....

You will now see what happened to all those branches which were cut from the trees when opening up the view last month (July)...

Firstly all the branches were sorted and any which were nice and thick and straight were cut with a chainsaw, they were then used on their ends to build a log semi circle feature at the point where the wildlife/natural area begins...  

I also bought in some 4' round posts which were cut down to size and hammered into the ground to create pathways, which will eventually be covered in bark chippings and planted with ferns and native woodland bulbs...
The thinner branches were also recycled and used to create natural borders which again when planted should become home to various types of wildlife...
From the picture below you can see how you will be led into this area and forced to walk along the woodland paths which will eventually lead you to a sunny seating area (not built yet!)...
These 'logged' enclosures were then filled with hardcore, soil and compost to create banks and planting areas which will give the area interest and depth whilst forming a natural association to the rest of the garden...

 Once planted the paths and banks will add wonderful secret areas for my young daughter and her friends to explore and hide in. Hopefully they will also be area where we can all enjoy a bit of wildlife spotting also....To increase the interest for children the banks will be turfed and as you can see from the below picture accessed by either a slope or steps so that they can run along the paths or over the top of the banks themselves....
Finally the bank with a turf  path on, you can also see that both edges have been left for planting, to the back of this I will plant native wild shrubs which will hopefully encourage wildlife and add some secrecy to the paths behind....
This is as about as far as I have got with this area so far other than planting out several hundred native bulbs such as: English bluebells, snowdrops, anemones, snakes head fritalliries, glory of the snow amongst others. Also already planted here are some ferns placed in the shade of the log bank along the paths and a selection of daffodils and tulips to add some early colour. Please do keep watching to see how this area develops as I continue landscaping and planting it.....Oh and add a bog garden with a twist!!!!!....

Once again thanks for reading.

Next time: Another bridge and a pebble stream....

Thursday, January 13, 2011

Summer Decking & Wet New Year!!

Hello and a happy New Year to you all...

Last blog we were back in July working hard on the beginnings of the new deck, hopefully in this blog we should finish the deck and get ready for the next project!

As it was nearly Christmas I posted some pictures of the snow which for us was a real treat and yes we did have a white Christmas!!....

To welcome you to the new year and before we go backwards once again into 2010 here are some pictures which I snapped on my phone on the way home from work today....it ain't snow!...

Above and Below...this is a small drain not too far from my house, these fields actually border the countryside behind the house!...looks like 2011 might be wet...bring back the snow!!


Right then enough of all that and back to the real business of gardening, in this instance the continuation of the raised deck...so lets go back to a very hot and sunny July 2010 and see if I managed to complete the deck...

With all the boards fixed down to the batons on the raised patio next job was to fix the step runners onto the front posts of the raised frame. I ran a piece of strong timber across the front of these posts and then screwed the runners into place fixing them to the posts and the timber for extra support. Notice that the deck will sit level with the top of the pond helping to give the feeling that they are both part of the same structure!...

Once all the boards were screwed securely in place I completed the fronts of the steps by using a cut down deck board. To stop the steps feeling to 'boxy' you can see that I left a gap between each step. By doing this and leaving the underneath of the raised deck area open it should act as a deterrent to any vermin who might be thinking of taking up residence under here!.... 


Last job was to make and fix the railings in place. Each newel post required careful 'slimming' with a chain saw to ensure a good snug fit into it's metal shoe which helps to prevent it from moving when leaned on! Also to get the perspective right every single rail (about 80) had to be cut down to size before being fixed between the base and hand rails, these were made up in the shed and then screwed into place. Amazingly every single one fitted!!...
A look back at the deck shows it sitting level to the top of the pond and the use of wood for both structures complement each other nicely I think (the green plants in the foreground are actually horsetail which is an extremely hardy, invasive and persistent weed which will require completely digging out..ouch!)....
A good time to take stock and look at where we are at this stage. this picture was taken from the sleeper bridge on 1st September looking back towards the house, it shows the garden beginning to take shape and where the project is after about 5 months work!


Now that the pond is complete and the deck is finished I'm sure you're all thinking that there isn't much else to do?...How wrong can you be!...I've got lots more ideas and plans and after all it's only the beginning of September so plenty of time to start a few more projects!...

Next time...What the hell am I going to do here????!!??...
To find out what happens to this disused junk yard tune in next time...You might be surprised!!! 


Quickly before I sign off it wouldn't be right not to mention our feathered friends who I have been keeping well fed through this harsh and unpredictable winter of ours...They have rewarded me with giving me some great photo opportunities and I have seen so many more species this year compared to others. Two new species this month (Jan 2011) have been a Tree Creeper and a Brambling which I haven't had the pleasure of seeing before.
I will finally leave you with a recent capture of a greedy crow in flight...
'Greedy Crow' shot by hand at a rang of about 100feet and amazingly taken through a double glazed window!...


See you all next time...

Wednesday, December 22, 2010

DECK the halls with...a white Christmas!

As promised in this blog I will be starting my DECK project however the weather here in England has been unusually cold and snowy for December, in fact the coldest December since records began!

I am pleased to say that our audience has grown recently with visits from USA, Canada and Vietnam...WOW!!
Now I know that Canada and USA can have exceptionally cold winters so our predicted -9 / -14 for Christmas eve might not be that cold for you but here it is unheard of so to wish you all a Merry Christmas and New Year here are a few 'winter' photos taken in the garden this week....

Snowy view from bedroom window...


My friendly Robin who is keeping guard of the feeders in this weather!...


The blackbirds have been stripping the berries from the hawthorn and pyracanthas...


Ah that Magpie again...I think the photos are slowly improving??...(for you photographers this is a hand-held shot at about 30mtrs using a 70mm-200mm zoom lens, aperture f2.8, ISO 320)


Finally the snow covered garden...


All hands on deck....

As promised here comes the gardening bit...I discussed the layout of the garden and raised patio areas in my last blog but will just remind you that the idea behind the deck was to bring it out level to the top of the pond and maximise the open views at the bottom of the garden. As it was to be built on two existing stone patios at different levels it required construction partly on batons fixed directly onto the slabs and part construction on a frame built on stilts. In my previous house I built a raised deck on stilts so felt comfortable with taking this build on but knew that I had to get the levels perfect so it would sit level with the pond and not look odd. As usual I will use photos to demonstrate the build of this feature...


20mm thick batons were fixed to the solid patio slabs and then deck boards screwed down onto these batons. 20mm were used as they allow air flow between the deck boards and concrete and should discourage unwanted residents from making home under the boards!! Note the post shoes were also bolted down to the slabs at this stage so that the deck boards could be cut around them so that less of the shoes are exposed making for a neater job.


I used 4meter long lengths of deck board, which had been hanging around a timber yard for a year or two. This worked out much cheaper and also gives more time for the boards to mature and leach out any unwanted chemicals. When building so near to a pond chemicals and preservatives can be a potential nightmare so where possible use untreated boards or as I have found well 'matured' boards! You can now also see the meter high drop off which will require a frame on stilts!


I needed all the help I could get for this project....but had to settle for some moral support from my best mate!


 Here is the frame under construction. I built it on 4" posts that were held in place by more post shoes bolted into the concrete floor again. Please note that I even used a spirit level!....however don't forget that you will need a slight drop on the deck to allow rain water to drain away. I also opted to run the boards parallel to the pond to reduce the risk of chemicals leaching out of the boards and straight into the pond!...


This deck is a big project and too much to put into one blog so I will leave it at this point and continue this build in my next blog when we will be getting all the boards on, sorting out steps and erecting posts and hand rails...

Once again I have many detailed pictures of all of my builds so please leave a message if you want to see further pictures or ask about specific points.

See you next time... **AND A MERRY CHRISTMAS AND HAPPY NEW YEAR TO YOU ALL**

Wednesday, December 15, 2010

Wake up sleepers what a view!!!

Well here I am again, it is actually December and less than two weeks away from Christmas! This blog is taking us back to July 2010 when temperatures here were in the high eighties and the air heavy and humid... lovely!!.

Now last blog we got to the end of the pond build with fish safely in and enjoying their new home. Work at this stage was still only just beginning and I had plans in my head of a raised deck, opening up the view at the bottom of the garden amongst 101 other ideas which were spinning around in my head!

When ordering the sleepers for the pond I actually over ordered to make sure that I wasn't short on the build and to allow me extra materials for further landscaping etc. At this stage further landscaping is a bit of a make it up as you go along for me so with the dozen sleepers I set about using them to follow the wood theme through the garden and soften the impact of the sleeper pond. The house is set raised up from the garden which steps naturally from the house down to a raised patio (top of pond level) and then down again to a lower patio and then down another two steps to the lawned garden. I already had a plan of turning the raised patio into a raised decked area which would sit level to the top of the pond so it seemed that a sleeper feature further down on the lower level would lead you out into the garden using the same theme. With this in mind I built the following 'tropical' planter to act as an entrance to the rest of the garden. Once again I think pictures will demonstrate this better than words...


Raised planter constructed to mirror the pond construction and planted with tropical type plants such as Banana, Canna, Bamboo and Cordylines.


Once the plants started to grow this planter put on a spectacular display. Next year I plan to add further tropical planters and attempt to grow more 'exotic' plants.


A bridge too far....
To extend the wood theme further and tie the garden together the natural dip in the lawn was used to add a bridge and create a feature and a natural link to the lower part of the garden.


Three sleepers and four posts were bolted together and screwed down onto a wooden plinth each side of the bank...


Levels were made up with top soil and plants planted (irises, crocosmia and primula) grass seed sowed...


The finished bridge sits nicely in the lawn linking both areas together....


The view...

This may sound like the simplest of jobs pruning a few trees and taming an old hawthorn hedge? Generally I'm sure it would be but throw in a wobbly ladder, a chainsaw and a gardener who suffers from severe vertigo and you have recipe for a lot of blood sweat and tears!!!...I could now share with you my tales of hanging onto a wobbling ladder whilst a 30 foot branch tries it's best to knock me clean off but I think I've now learned my lesson and will leave it to the professionals next time!!...

I think the pictures say it all...
View before...


View after!!!!....we didn't even realise what a view we had until we opened it up so a real treasure to find!


Now what do you do with all those branches that you have cut down?...recycle them of course!...a future blog will go into this in more detail but here's an idea what you can do with you 'left overs'...
A 'left over' log and sleeper bench to admire your new view from!...don't you just love chainsaws!!


Next blog we will be starting the raised deck, so lots more hard graft and sweaty brows!!...

Tuesday, December 7, 2010

A grand home for any fish....

The pond continues....

Construction of my pond continued with more than it's share of problems. Having completed the sleeper walls I set about digging out the bottom of the pond which I thought would be easy....until I realised that the area which I had chosen for the pond must have been the builders 'spoil' heap when the houses here were built! There was so much broken rock and hardcore that I couldn't get a spade into it which then meant every shovel full had to be broken with a wrecking bar or pickaxe before I could actually dig it out! This took me a very long time as it was dug by hand! I also had to stop work for a period of time as I had a nest of ground bees in the pond base who luckily for me got fed up and left after a few weeks! Due to the amount of horsetail weed and stones which I feared could potentially puncture the rubber liner I added an 'unplanned' concrete base to the base and sides of the pond! The total project which I expected to take a few weeks ended up taking me from April-July!

The fish which are a mixture of Koi, Tench, Golden Rudd & Carp were stocked gradually over a six week period. The first fish went in at 5pm one day and at 5am the following day I awoke to find a big fat heron trying to fish them back out again!....Some improvised safety covers were designed and fitted rather quickly!...

The pictures below will hopefully demonstrate the build better than I can put into words...

Sleepers in place...digging starts...approximately 3' of soil and 'spoil' dug out by hand!
Digging complete, base and base sides concreted in... 
layer of sand added across base to help protect the liner...
Old carpet and pond liner membrane were also added to help protect the liner...
Liner laid in and pond starting to fill...
Water in...oak capping put in place prior to trimming off excess liner...notice plants added as early as possible to help the water mature...filtration unit is also running from as early a stage as possible...
Fish added....they seemed to like their new home...
Unwelcome visitor....waiting to empty the pond!...
Removable safety (& anti heron) covers designed and fitted....

Unfortunately I haven't space to include many of the photos which I took during the pond build. If you would like to see more detailed pictures of the build or a certain part of the build leave me a comment on here and I will attempt to include some more...

Pond Dimensions: 3mtrs x 3mtrs x 4' deep = 11250litres (2500gallons)

Next blog...what am I going to do with those left over sleepers?...and a room with a view...